Summer Tomato & Corn Galette

I’m pretty sure that galettes are my spirit dish… a little rough around the edges, but there’s goodness on the inside! Galettes are great because they are meant to look rustic, so there’s no need to strive for perfection… the more imperfect, the better. I also love that galettes can evolve with the season –all you need is a good basic pie dough recipe on hand, and you can fill it with whatever veggie (or fruit!) combination that strikes your fancy. There are a million different pie dough recipes out there, so feel free to use whatever recipe you like best (I like this one from Fine Cooking). Recipe adapted from David Lebovitz in Fine Cooking.

SUMMER TOMATO & CORN GALETTE

INGREDIENTS

  • 2 tablespoons olive oil

  • 1 large yellow onion, diced

  • Salt and freshly ground black pepper

  • 2 cloves garlic, minced

  • Kernels removed from 2 ears of corn (about 2 cups)

  • 1 recipe pie dough (I like this one, but use whatever recipe you like!)

  • 1/2 cup gruyère or aged gouda cheese, shredded (plus more for garnish)

  • 1 large or 2 medium ripe tomatoes (about 1 lb total) cut into 1/3-inch slices, drained on paper towels

  • 1 large egg yolk mixed with a splash of milk or cream

  • Handful fresh basil, finely chopped (for garnish)

PREPARATION

  1. Heat the olive oil in a large nonstick sauté pan over medium heat. Add the diced onion and cook, stirring frequently, until lightly browned, about 8 minutes. Season with salt and pepper. Lower the heat a bit and add the garlic and corn and cook for a minute or two (just make sure the garlic doesn’t burn). Transfer the mixture to a bowl and set aside to cool.

  2. Adjust an oven rack to the center position and heat the oven to 375°F. Line a baking sheet, preferably one without sides, with kitchen parchment. (If your baking sheet has sides, flip it over and use the back.)

  3. Roll the dough on a floured surface into a 15-inch round, lifting the dough with a metal spatula as you roll to make sure it’s not sticking. If it is, dust the surface with more flour. Transfer it by rolling it around the rolling pin and unrolling it on the lined baking sheet.

  4. Spread the onion and corn mixture over the dough, leaving a 2-inch border without filling (I also reserve a little of the corn mixture to sprinkle on top of the tomatoes, but that is optional). Sprinkle the cheese over the onion and corn mixture. Arrange the tomatoes in a single layer over the onions and corn and season them with salt and pepper. If desired, top the tomatoes with some of your reserved corn mixture.

  5. Lift the edges of the dough and fold them inward over the filling, pleating as you go, to form a folded-over border. Pinch together any tears in the dough. Brush the egg yolk and milk mixture over the exposed crust.

  6. Bake until the crust has browned, 35 to 45 min. Slide the galette off the parchment and onto a cooling rack. Let cool for 10 minutes. Cut the galette into wedges, garnish with a bit more cheese and the chopped fresh basil, and serve.

Shakshuka

Shakshuka is a traditional dish from North Africa with lots of variations – but essentially it’s a skillet filled with a hearty tomato sauce with onions, peppers, spices, and some poached eggs on top. I like to serve shakshuka over a bed of basmati rice, topped with some fresh parsley or cilantro, avocado, and some salty feta cheese. It takes less than 30 minutes to pull everything together, and makes a perfect weeknight meal. Happy cooking!

SHAKSHUKA

INGREDIENTS

  • 2 tablespoons extra-virgin olive oil

  • 1 yellow onion, chopped

  • 1 red bell pepper, seeded and diced into 1/2” pieces

  • Kosher salt

  • Freshly ground black pepper

  • 3 medium garlic cloves, minced

  • 1 teaspoon smoked paprika

  • 1 teaspoon ground cumin

  • 1/4 teaspoon red pepper flakes

  • 1 28-ounce can crushed tomatoes (diced tomatoes will work too)

  • 2 tablespoons harissa paste (mild or hot, your preference)

  • 1 tablespoon tomato paste

  • A few handfuls of fresh spinach, roughly chopped

  • 3 to 5 eggs

  • ⅓ cup crumbled feta cheese

  • ¼ cup fresh parsley leaves

  • 1 avocado, diced (optional)

  • Toasted bread (optional)

PREPARATION

  1. Heat the oil over medium heat in a large lidded skillet. Add the onion, red pepper, 1/2 teaspoon salt, and several grinds of fresh pepper and cook until the onion is soft and translucent, 6 to 8 minutes.

  2. Reduce the heat to medium-low and add the garlic, paprika, cumin, and red pepper flakes. Stir and let cook for about 30 seconds, then add the canned tomatoes, harissa paste, and tomato paste. Simmer and stir occasionally for 15 minutes until the sauce is thickened.

  3. Add the spinach and stir until wilted. Use a large spoon to make wells in the sauce and crack an egg into each well. Cover and cook over medium heat until the eggs are set, about 5 minutes – though the timing will also depend on how runny you like your egg yolks.

  4. Season with salt and pepper to taste and sprinkle with the feta, parsley and avocado, if using. Serve over basmati rice and with toasted bread for scooping.

Beef & Bean Enchiladas

Homemade enchiladas may look like a lot of ingredients and steps, but I promise that the whole process goes WAY quicker than you expect. But pretty please don’t skip the step of making your own enchilada sauce! It will be well worth the tiny bit of extra effort, and will be way tastier + healthier than the store-bought stuff. For this recipe, the enchilada filling has ground beef + beans, but you can totally substitute with other proteins like shredded pork or chicken, or make them vegetarian by subbing with sautéed veggies like mushrooms, peppers, zucchini, etc.

BEEF & BEAN ENCHILADAS

Photo Credit: The Beach House Kitchen

INGREDIENTS

For the Enchilada Sauce

  • 3 tablespoons olive oil

  • 3 tablespoons flour (GF flour works too)

  • 1 tablespoon brown sugar

  • 1-2 teaspoons chipotle chili powder (use more or less based on your spice tolerance!)

  • 1 teaspoon ground cumin

  • ½ teaspoon garlic powder

  • ¼ teaspoon dried oregano

  • ¼ teaspoon cinnamon

  • ¼ teaspoon salt, to taste

  • 2 tablespoons tomato paste

  • 2 cups broth (vegetable, chicken, or beef)

  • 1 tablespoon apple cider vinegar

  • Freshly ground black pepper, to taste

For the Enchiladas

  • 1 tablespoon olive oil

  • 1 yellow onion, finely chopped

  • 2 garlic cloves, minced

  • ¼ teaspoon salt, to taste

  • 1 lb ground beef

  • 1 can (14-oz) black beans, rinsed and drained

  • 1 can (14-oz) can pinto beans, rinsed and drained

  • 8 tortillas (or burrito wraps)

  • 1.5-2 cups shredded cheese

  • Handful fresh cilantro, roughly chopped (optional garnish)

INSTRUCTIONS

  1. First make the enchilada sauce – Measure out the dry ingredients (the flour, brown sugar, chili powder, cumin, garlic powder, oregano, cinnamon and salt) into a small bowl. In a medium-sized pot over medium heat, warm the oil until it’s sizzling, then pour in the flour + spice mixture. While whisking constantly, cook until fragrant and slightly deepened in color, about 1 minute. Whisk the tomato paste into the mixture, then slowly pour in the broth while whisking constantly to remove any lumps. Raise heat to medium-high and bring the mixture to a simmer, then reduce heat as necessary to maintain a gentle simmer. Cook, whisking often, for about 5 to 7 minutes, until the sauce has thickened a bit and a spoon encounters some resistance as you stir it. Remove from heat, then whisk in the vinegar and season to taste with additional salt and/or pepper.

  2. Make the beef and bean enchilada filling – Preheat your oven 350F. Heat olive oil in a skillet over high heat. Add onion, garlic, and salt and cook for 2 minutes. Add ground beef and cook for 4-5 minutes, breaking it up as you go, until most of the meat has browned. Next add the rinsed and drained black + pinto beans to the skillet, as well as 1/4 cup of your enchilada sauce. Stir to combine and continue cooking until the ground beef is fully cooked. Taste and add additional salt if needed.

  3. Assemble and bake the enchiladas – Smear a bit of the enchilada sauce on the bottom of a 9x13 pyrex baking dish. Assemble the enchiladas by scooping the enchilada filling on the lower third of a tortilla. Roll up the tortilla and then place in the baking dish, seam side down. Repeat with remaining filling and tortillas. Pour enchilada sauce over the enchiladas and top with the shredded cheese. Bake for 10 minutes covered, then 10 minutes uncovered. Serve hot and enjoy!

Slow Cooked Beef Short Ribs

Balancing cooking with taking care of a newborn means that there are a lot more crock pot/slow cooker meals happening around here! But even if you don’t have a new baby around, I have a feeling we all can use some go-to recipes that only require a little prep, and then can be totally forgotten about until dinner time. We were craving something hearty and comforting, so I tried out this slow cooked beef short ribs recipe, which I’ve adapted a bit from Taste of Home, and we are BIG fans.

This dish does have a bit of prep to sear the short ribs and then saute + simmer some onions, garlic, tomato paste, red wine etc in the beef fat – but once you combine everything in the slow cooker, it will just do its thing for 6-8 hours on low. There is a final step of turning the remaining liquid in the slow cooker into a luxurious sauce, but I promise that part is SUPER easy and just takes a few extra minutes…. don’t skip that part, because it is divine! We enjoyed these short ribs with some mashed potatoes, which I highly recommend.

SLOW COOKED BEEF SHORT RIBS

Photo Credit: Chelsea’s Messy Apron

INGREDIENTS

  • 3 pounds bone-in beef short ribs

  • Salt and pepper

  • 1 tablespoon canola oil

  • 2 cups carrots (4-6 medium carrots), cut into 1-inch pieces

  • 1 cup celery (~2 stalks celery), sliced

  • 1 cup beef broth

  • 2 tablespoons dried thyme or rosemary

  • 1 bay leaf

  • 2 large yellow onions, cut into 1/2-inch wedges

  • 6 garlic cloves, minced

  • 1 tablespoon tomato paste

  • 2 cups dry red wine (or beef broth)

  • 1 heaping tablespoon cornstarch

  • 3 tablespoons cold water

PREPARATION

  1. Sprinkle ribs generously with salt and pepper. In a large skillet, heat oil over medium-high heat. In batches, brown ribs on all sides; transfer to a 4 or 5 qt. slow cooker. Add carrots, celery, beef broth, dried thyme (or rosemary) and bay leaf to the ribs.

  2. Add onions to the same skillet, cook and stir over medium heat 5-6 minutes or until tender. Add minced garlic and tomato paste, cook and stir 1 minute longer. Stir in 2 cups wine (or beef broth). Bring to a boil, cook 8-10 minutes or until liquid is reduced by half. Add everything in the pan into the slow cooker. Cook, covered, on low 6-8 hours or until meat is tender and falling off the bone. Remove ribs and vegetables from the slow cooker and keep warm.

  3. To make the sauce, transfer cooking juices to a small saucepan; skim off fat and discard the bay leaf. Bring the juices to a boil. In a small bowl, mix cornstarch and water until smooth, then stir into cooking juices. Return to a boil, cook and stir 1-2 minutes or until thickened. Taste and add additional salt or pepper if needed. Serve sauce with ribs and vegetables.

Sheet Pan Harissa Chicken with Potatoes, Leeks & Herby Yogurt

As someone who loves to cook, but doesn’t love doing dishes / spending hours in the kitchen, I’m all about sheet-pan dinners (ie, when a protein and side dish can cook together at the same time on a sheet pan and voila! you’ve got dinner and only one pan to clean). This recipe, which is adapted from Food52, is hands down one of my go-to sheet pan meals. It’s packed with bright Mediterranean flavors, takes only a few minutes to prep, cooks for about 45 minutes in the oven, and makes for a fabulous weeknight meal that also feels special enough for a weekend dinner party.

SHEET PAN HARISSA CHICKEN WITH POTATOES, LEEKS & HERBY YOGURT

IMG_4110.JPG

INGREDIENTS

  • 1.5-2 lbs pounds bone-in, skin-on chicken thighs

  • 2 lbs Yukon Gold potatoes, cut into 1” chunks

  • 3 teaspoons kosher salt, divided

  • 3/4 teaspoon freshly ground black pepper

  • 3 tablespoons harissa

  • 1 teaspoon ground cumin

  • 5 tablespoons extra-virgin olive oil, plus more as needed

  • 2-3 leeks, white and light green parts, halved lengthwise, rinsed, and thinly sliced into half-moons

  • Zest and juice of 1 lemon, divided

  • 1 cup plain Greek yogurt

  • 1 small garlic clove

  • 1/2 cup chopped soft fresh herbs such as dill, parsley, mint, and/or cilantro leaves

INSTRUCTIONS

  1. Heat the oven to 425°F.

  2. Combine the chicken and potatoes in a large bowl. Season them with 2½ teaspoons of the salt and ½ teaspoon of the pepper. In a small bowl, whisk together the harissa, cumin, and 3 tablespoons of the olive oil. Pour this mixture over the chicken and potatoes, and toss to combine.

  3. Arrange the chicken and potatoes in a single layer on a large rimmed baking sheet, and roast for 20 minutes.

  4. While the chicken and potatoes are roasting, combine the leeks, lemon zest, ¼ teaspoon of the salt, and the remaining 2 tablespoons olive oil in a medium bowl.

  5. After the chicken and potatoes have been cooking for 20 minutes, use a spatula to toss the potatoes lightly, then scatter the leeks over the baking sheet. Roast until the chicken is cooked through and everything is golden and slightly crisped, 20 to 25 minutes longer.

  6. While the chicken cooks, put the yogurt in a small bowl. Grate the garlic clove over the yogurt, add a handful of your chopped herbs and season with the remaining ¼ teaspoon salt, ¼ teaspoon pepper, and juice of your lemon. Taste and adjust seasoning as needed.

  7. To serve, you can spoon the yogurt over the chicken and veggies in the baking sheet, or you can transfer everything to serving platters/bowls. Scatter remaining herbs over everything, add a pinch (or two) of flakey sea salt, and drizzle with additional olive oil and/or lemon juice and enjoy!

One-Pot Chicken with Caramelized Lemon & Dates

If (or when) you find yourself craving a darn good roast chicken dish that goes from pot to plate in under 45 minutes, give this recipe a try! It’s from Alison Roman’s most recent cookbook, Nothing Fancy. While one version of the recipe has you using a whole chicken (which is delicious) – I just didn’t have the time/patience to roast a whole chicken, so I used a version of the recipe that’s meant for smaller chicken parts, like thighs or quarters. All in all, the recipe takes about 10 minutes of prep, followed by 25 minutes in the oven, and viola! We had a most delicious, one-pot dish of juicy, crispy-skinned chicken and some mouth-watering caramelized lemons, dates, and shallots that we spooned over brown rice.

ALISON ROMAN’S ONE-POT CHICKEN WITH CARAMELIZED LEMON & DATES

INGREDIENTS

  • ~3 lbs. bone-in, skin-on chicken quarters or chicken thighs

  • Kosher salt

  • Freshly ground pepper

  • 1 tablespoon canola oil

  • 1 lemon, cut into thick slices crosswise (about 1/4” thick), seeds removed

  • 2 shallots, peeled if you want, halved lengthwise (or one red onion, peeled and cut into wedges)

  • 6 medjool dates, pitted

  • 4 sprigs thyme or oregano, plus more for serving  

  • 1–2  teaspoons crushed red pepper flakes

INSTRUCTIONS

  1. Preheat oven to 425°.

  2. Season chicken with salt and pepper. Heat oil in a large dutch oven over medium–high heat. Place chicken, skin side down and using tongs or your hands (be careful!) press lightly to make sure the skin comes into even contact with the pot.

  3. Cook, without moving, until chicken is nice and browned, 5– 8 minutes. You will likely need to brown the chicken pieces in batches. Once you’ve finished browning a piece, remove it with tongs to a plate and a new piece in its place. A note that during this step while the chicken is browning, I’ll slices the lemons, shallots, and dates to speed up the prep for this dish.

  4. As you get to the end of browning the chicken, add the lemon slices to the pot, maneuvering the chicken as needed so that the slices come into contact with the bottom of the pot. Some of the chicken pieces will probably need to stay out of the pot a bit longer, for the lemon slices to fit.

  5. Let the lemons sizzle in the chicken fat until caramelized on one side, about 2 minutes. Add all the chicken pieces back into the pot (skin side up), along with the shallots, dates, thyme and 1.5 cups of water. Sprinkle the top of the chicken with crushed red pepper flakes and another pinch of salt.

  6. Place dutch oven in the oven (with the lid OFF the pot so the chicken skin can get crispy) and roast until the dates are plump, the lemon is jammy and the chicken is cooked through and golden (and a thermometer inserted into the thickest part of the chicken reads at least 165F).

  7. Remove from oven and let chicken rest in the dutch oven for 10 minutes before transferring it to a serving platter. Serve alongside shallots, lemons, and dates with some more thyme sprinkled over. I recommend enjoying with rice, and spooning some of the yummy juices from the dutch oven spooned over the rice.

  8. DO AHEAD: This chicken can be made a few hours ahead, kept in the dutch oven. If you wish to reheat it before serving, pop it back into the oven without a lid for 10–15 minutes or so.

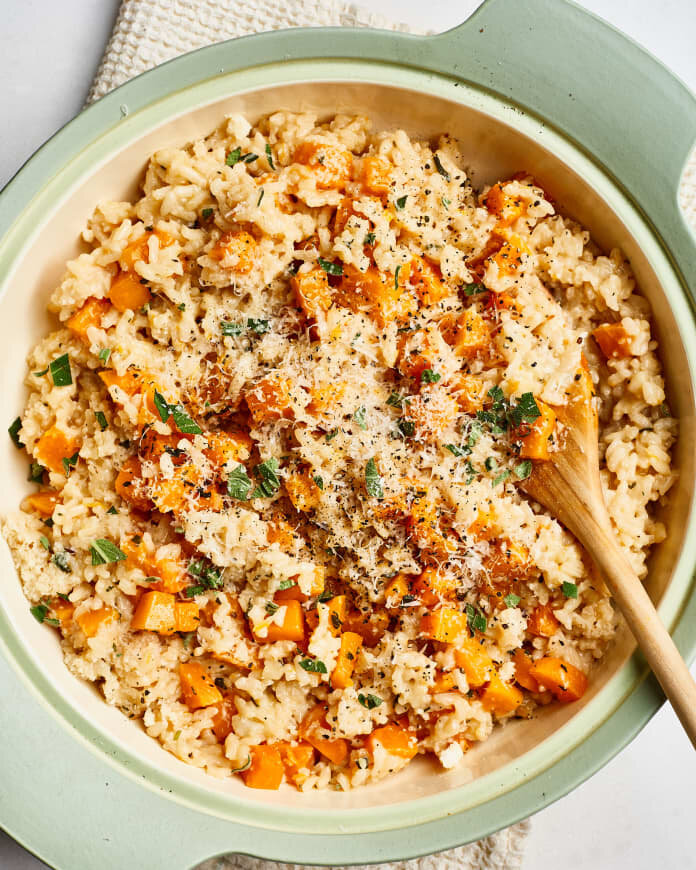
Butternut Squash Risotto

I’ll admit that when I usually think about making risotto, I assume it’s going to be a giant pain (ie lots of standing over a pot and constantly stirring) and I end up making something else. And sometimes, you just want a warm, creamy, salty bowl of risotto, ya know? So, while there is some stirring involved, I’m usually surprised by how quickly it all comes together. This recipe for Butternut Squash Risotto is from The Kitchn.

BUTTERNUT SQUASH RISOTTO

Serves 6

Photo via The Kitchn.

Photo via The Kitchn.

Ingredients

  • 8 cups low-sodium chicken or vegetable broth

  • 3 tablespoons butter, divided

  • 1 medium butternut squash (about 2 1/2 pounds), peeled and cut into 1/2-inch pieces (about 4 cups)

  • 1 1/2 tablespoons chopped fresh sage leaves

  • 1 teaspoon kosher salt, divided

  • 1/2 teaspoon freshly ground black pepper, divided

  • 1 large shallot (or white/yellow onion), finely chopped

  • 2 cups arborio rice

  • 1/2 cup dry white wine

  • 1 cup finely grated Parmesan cheese (about 2 ounces), plus more for serving

Instructions

  1. Place the broth in a medium saucepan over low heat and keep it at a very low simmer.

  2. Melt 1 tablespoon of butter over medium heat in a large, high-sided sauté pan or Dutch oven. Add the butternut squash, sage, 1/2 teaspoon of the salt, and 1/4 teaspoon of the pepper, and cook until the squash is lightly caramelized and tender, 10 to 12 minutes. Transfer the squash to a plate and set aside.

  3. Melt another 1 tablespoon of butter in the pan. Add the shallots (or onions) and sauté until fragrant and beginning to soften, about 4 minutes.

  4. Add the rice and cook, stirring until the edges have turned translucent but the center is still opaque, about 2 minutes. Add the wine and simmer, stirring constantly, until the wine has completely reduced and the pan is nearly dry, about 3 minutes.

  5. Begin incrementally adding the broth one ladle at a time, stirring constantly. Wait until the liquid has been almost completely absorbed by the rice before adding another ladle. After about 12 minutes, stir in the remaining 1/2 teaspoon salt and 1/4 teaspoon pepper and begin tasting the rice to gauge how far it has cooked.

  6. Continue adding broth until the rice is al dente (still has a bit of chew), the broth is creamy, and the dish has the consistency of thick porridge, 20 to 30 minutes total (you might not use up all of the broth). If you run your spatula through the risotto, the risotto should flow slowly to fill in the space.

  7. Remove the pan from the heat. Stir in the reserved squash, Parmesan, and remaining 1 tablespoon butter until melted. Taste and season with salt as needed. Serve immediately, garnishing each bowl with additional Parmesan cheese.

Homemade Pizza Dough

HOMEMADE PIZZA DOUGH

Makes 1 very large pizza or two 12” pizzas

IMG_2740.JPG

INGREDIENTS

  • 3 cups (375 grams) all-purpose flour

  • Slightly heaped ⅛ teaspoon (Overnight), ¼ (All-Day) or 1/2 teaspoon (Part-Day) instant or active dry yeast

  • 1 1/2 teaspoons sea or kosher salt

  • 1 1/3 cup room temperature water

PREPARATION

  • In a very large bowl, mix all ingredients with a spoon. The dough will be craggy and rough; this is fine! Cover bowl with plastic and keep at room temperature for approximately 22 (for Overnight schedule), 12 (for All-Day schedule) or 6 (for Part-Day schedule) hours, or until the dough has more than doubled. This takes longer in a chilly room and less in a very warm one, but don’t fret too much over this, as the dough is generally forgiving of a loosened schedule.

  • About 30 minutes before the dough is ready, heat the oven to its highest temperature – usually 550F. Put a baking tray in the oven *upside down* while the oven heats up. If you have a pizza stone, use that instead. 

  • Tear off a sheet of parchment the same size as your pizza stone/baking tray, and sprinkle it with cornmeal. 

  • Flour your counter very well. Scrape dough out of the bowl onto a floured counter; in the time it has risen it should change from that craggy rough ball to something very loose, soft, sticky and stretchy. Flour the top of the dough, and divide dough in half (or more pieces, if you’re making smaller pizzas). Form them into ball-like shapes. Use floured fingers to press and nudge dough into a roughly round or rectangular shape. Pick up the dough and circle it around your fists, letting the gravity gently stretch the dough. 

  • Land the dough on your prepared sheet of parchment paper. Add desired fixings and bake for 12 to 15 minutes, rotating if it’s baking unevenly, until the top is blistered and the crust is golden. 

Do ahead option: Once risen and formed into ball-like shapes, the dough can be wrapped in plastic and refrigerated for up to 3 days.

Saucy Shrimp & Polenta

Here’s my take on the classic Shrimp & Grits – which, I’ll admit, looks way longer/more complicated than it actually is! When it comes to making the saucy shrimp, it’s all about creating layers of flavor – starting by cooking the bacon, and then the seasoned shrimp in the bacon fat, followed by the aromatics and veggies, and finally adding liquid to bring it all together together. With each step, you’re creating layers of complex flavor that will be totally worth it in the end, I promise!

SAUCY SHRIMP & POLENTA

Serves 4

IMG_3080.jpg

INGREDIENTS

For the Polenta

  • 3 cups whole milk

  • 2 cups water

  • 1 tablespoon olive oil

  • 1 tablespoon kosher salt, plus more to taste

  • 2 cups polenta

  • 1/2 cup grated parmesan cheese

  • 2 tablespoons butter

  • Freshly ground pepper

For the Saucy Shrimp

  • 4 slices bacon, diced

  • 1 lb large shrimp, shelled and deveined, tails removed

  • 2 teaspoons Old Bay (or preferred seasoning mix)

  • 1 small yellow onion (or shallot), finely diced

  • 2 cloves garlic, minced

  • Salt

  • 2 tablespoons tomato paste

  • 1 teaspoon cumin

  • 1 teaspoon paprika

  • 1 teaspoon dried oregano

  • 1/4 teaspoon red pepper flakes

  • 2 yellow, red, or orange bell peppers, finely diced

  • 1/2 cup dry white wine

  • 1 cup chicken or vegetable broth

  • 1 tablespoon cornstarch (optional)

  • 2 cups cherry tomatoes, cut in half

  • 1-2 tablespoons red wine vinegar

  • 1/2 cup heavy cream or half & half (optional)

INSTRUCTIONS

For the Polenta

  • In a medium saucepan, combine the milk, water, olive oil, and salt and bring to a simmer over high heat. Be careful, as this mixture can boil-over quickly!

  • Reduce heat to low and slowly whisk in the polenta, stirring constantly until it thickens, 10-15 minutes, adding more water or milk as needed. 

  • Turn the stove off and stir in the parmesan cheese and butter. Taste and adjust seasoning as needed. If the polenta seems too thick, just add a bit more water or milk.

For the Saucy Shrimp

  • Begin by patting the shrimp dry and tossing in a bowl with 2 teaspoons of Old Bay (or your preferred seasoning) and set aside.

  • Cook the diced bacon over medium-high heat in a large non-stick skillet until crisp. Remove bacon with a slotted spoon, transferring to paper towels to drain. Set aside. Pour off all but 2-3 tablespoons of bacon fat.

  • Add the seasoned shrimp to the skillet and cook in the bacon fat over medium-high heat until only just cooked and no longer translucent – about 2 minutes total, stirring as needed to make sure all sides are cooked. Use a slotted spoon to transfer the shrimp to a bowl and set aside.

  • If the skillet looks try, add another tablespoon or two of bacon fat (or butter or olive oil). Add the diced onions, minced garlic, and 1/4 teaspoon salt into the skillet and cook over medium heat until softened and beginning to brown, 4-5 minutes.

  • Add the tomato paste, cumin, paprika, oregano, red pepper flakes, and a pinch of salt and stir until well combined and fragrant, about a minute. Stir in the diced peppers and coat in the tomato paste and spices and cook for another minute over medium-high heat.

  • Add 1/2 cup dry white wine to the pan and use a flat wooden spoon to loosen any brown bits from the bottom of the skillet (this is where the flavor lives)! Once the wine has reduced by about half, stir in 1 cup chicken or vegetable stock to the skillet. Bring to a simmer and stir in 1 tablespoon cornstarch (optional, but will help thicken the sauce). Allow the sauce to simmer over medium heat for 4-5 minutes to soften the peppers and reduce the liquid.

  • Add the bacon, shrimp, and halved cherry tomatoes to the skillet and stir to combine. Add 1-2 tablespoons red wine vinegar and 1/2 cup heavy cream (if using). Simmer gently for another few minutes, or until the sauce reaches a consistency to your liking. Taste and adjust seasoning as needed.

To Serve

  • Warm the polenta over very low heat, if needed. If the polenta is too thick, add a bit of milk or water to thin and stir well to combine.

  • Scoop the creamy polenta into bowls to serve an top with the saucy shrimp. Garnish with fresh green herbs (like chives or parsley) and enjoy!