June 10

Farm Notes

Goodness gracious, it’s been an eventful week around here! Last weekend we snuck away to the beach for a friend’s wedding, and it was so nice to get off the farm and dip our toes in the cold ocean for a bit. Though of course, we had some excitement waiting for us when we got home… we came to find that we had NO water to our house or to the farm, and it took a while to figure out the problem. Long story short, we had to call in an emergency electrician, and after quite a bit of stress the problem was fixed, and hallelujah we have water back! Never again will I take for granted how easily we are (usually) able to access water… it really is one of our most precious resources.

Oh! And did I mention that when we got home on Sunday, I also found that we had caught a groundhog (that had been munching on all our okra..)? THAT was fun. We also have a sweet baby who is so darn wonderful, but who happens to also be teething terribly and has decided that he absolutely does not want to nap during the day, so that has also been an adventure to navigate!

On the bright side, all of our summer veggies have taken off, and a large chunk of my farm work these days is just spent harvesting… tomatoes, potatoes, zucchini, peppers, eggplant, etc. This week we kicked off our 10-week Summer CSA, and it was a bountiful and delicious start to the summer season.

Summer CSA Week 1

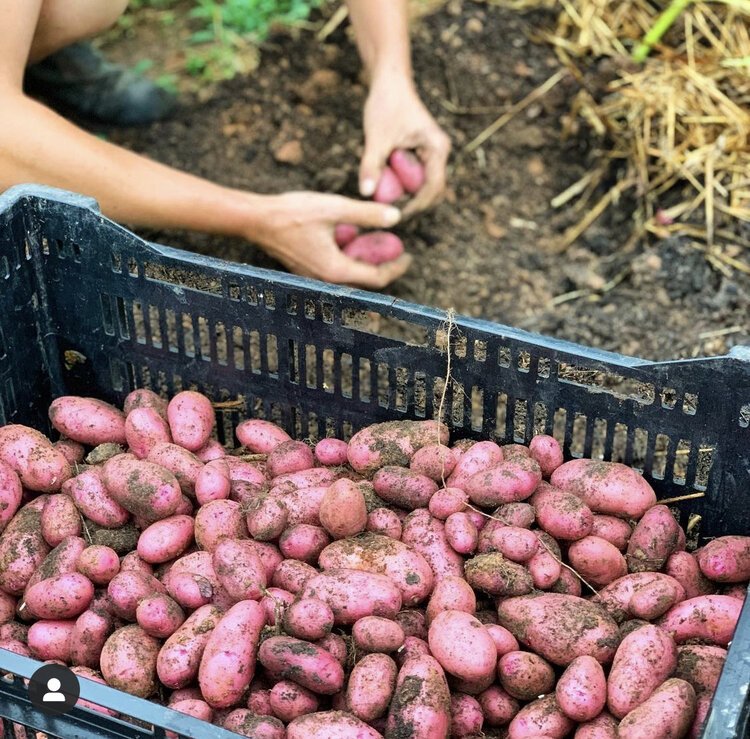
Over the past week or two, we’ve been digging up our potatoes, and goodness gracious they are beautiful. We grew 6 or 7 different varieties this year, and so far my favorite is Gold Nugget (pictured below). They are SO prolific, have beautiful color and shape, and most important of all – they are so dang delicious. Definitely going to grow a lot more of this variety in years to come!

Freshly dug Gold Nugget potatoes

A few notes about harvesting potatoes… the time to harvest is typically after the potato plant has flowered and the foliage begins to turn brown and die off. I like to carefully pull up the plant, and then use my hands to dig around a few feet deep (and across the bed) to dig up any tubers that may be hiding.

After harvesting, you’ll also want to cure your potatoes for 10-14 days. Potatoes like to cure in a dark, humid, and cool environment (around 45-60F)... your fridge may be a little colder than is ideal, but it will work in a pinch! I usually keep the dirt on while the potatoes are curing, and don’t wash until I’m ready to eat them.

Why go the extra step of curing? Curing helps to thicken the skin of the potatoes, and it slows the respiratory rate – which will allow the spuds to store longer.

As for the many other tasks that have been keeping us busy around the farm... we've been working to keep up with the weeds, pull out our spring brassica plants, and to stay on top of pruning + trellising all the tomatoes, peppers, eggplant, and cucumbers! For a full farm update and some trellising tips, be sure to watch my virtual farm walk from today – you can watch via our Facebook Group HERE or at our Google Drive folder HERE.

In other news, it’s time to announce the winner of our most recent giveaway! CONGRATS Wendy Royce! I’ll be in touch with you directly to send you your new Victorinox chef knife. :)

Kitchen Notes

These days, I pretty much always have some kind of herby, lemony, garlicy yogurt sauce on hand, and I put it on EVERYTHING… roasted veggies! raw veggies! chicken! fish! toasted bread! This is a no-recipe kind of recipe (and as an added bonus, it comes together in about 5 minutes), so just use whatever herbs you have on hand, and in whatever quantity feels good to you.

Herby, Lemony, Garlicy & Good On Everything Yogurt Sauce

Photo credit: Super Safeway

INGREDIENTS

  • 2 cups plain greek yogurt

  • 1/2 to 1 cup chopped fresh herbs (I like a combination of parsley, basil, dill, mint, chives, etc)

  • Juice + zest of 1 lemon

  • 1 clove garlic, minced

  • 3 tablespoons olive oil

  • Salt & pepper, to taste

PREPARATION

  1. Scoop the yogurt into a medium sized bowl, and simply stir in all the remaining ingredients.

  2. Taste and make adjustments as needed! Want more herbs? Throw a few more in! Needs more acid? Add more lemon! You get the idea. :)

Today’s Stats

  • Low temp: 63F

  • High temp: 85F

  • Sunrise: 6:00am

  • Sunset: 8:34pm

  • Moon phase: Waxing Gibbous

  • Additional notes: Sunny & warm

March 18

Farm Notes

Goodness gracious, it has been a WEEK. Last Saturday I spent pretty much all day scurrying around outside in the wind (and some snow flurries) making sure all our veggie babies were covered for the extremely cold (18F!) overnight temperatures. Thankfully, when I peeked under all our row cover on Sunday morning, I found that our veggies made it through with very little damage, which I am incredibly grateful for. I know that a lot of farmers in the area weren’t so lucky, and it’s a testament to how resilient farmers have to be in order to do this work.

With the freezing temps (hopefully) behind us, throughout this week we’ve been planting like crazy! On Tuesday we got many of our brassica plants in the ground – 3 kinds of kale, broccoli and cabbage. Plants in the brassica family prefer the cooler spring weather, so we plant them now so that we’re able to harvest them in May before the summer heat arrives.

Yesterday we planted our alliums (red and yellow onions, leeks, and scallions) and our potatoes. It’s apparently good luck to plant your potatoes on St. Patrick’s Day, so hopefully our taters will be filled with good juju, and in a few months we will be rolling in delicious potatoes for all our CSA members. Potatoes are one of my favorite veggies to grow (and hands down the most fun to harvest) and now is a great time to plant them, so today I’m sharing all my tips for growing potatoes!

BEFORE YOU PLANT

1) Source your seed potatoes from a reputable local farm/garden store (for local friends, we source ours from Country Farm & Home in Pittsboro). While you technically can plant potatoes from the grocery store, your best bet is to buy seed potatoes that are specifically bred to be used to for growing potatoes (as grocery store potatoes are often treated to prevent sprouting).

2) It’s recommended to “green sprout” your seed potatoes a 1-3 weeks before you plant them, which means putting your whole seed potatoes in a box and leaving them in a warm (70-85 F) and dark place to encourage their eyes to begin sprouting. Be careful when handling to avoid breaking off sprouted eyes.

3) If your potatoes are especially large (over 4 ounces) and have lots of eyes, you can cut them into smaller pieces, which allows you to get more out of each potato. Think of the size/weight of a chicken egg as your ideal size, and try to have at least 2 eyes per seed piece. If you are going to cut your potatoes, cut them 2-3 days before you plant, to allow the cut part of the potato to heal over (to avoid the potatoes from rotting in the ground).

PLANTING YOUR POTATOES

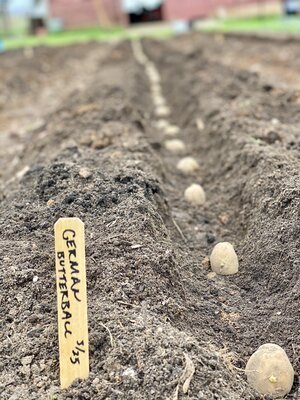
1) Prepare the soil by adding compost and any other amendments to you bed. Dig a trench in your bed about 4”-6” deep.

2) Lay seed pieces eyes pointing up in the trench spaced 8”-12” apart for standard potato varieties and 12”-18” apart for fingerling varieties.

3) Cover potatoes with a few inches of soil, leaving a bit of a trench in the bed (because over time, you’ll want to “hill” your potatoes with additional soil from the sides of your trench).

TENDING YOUR POTATOES

1) Generally, potatoes need between 1-2 inches of water per week, which can be provided by rain or you to make up the difference by watering.

2) You should “hill” your potatoes 2-3 times per season by loosening surrounding soil in the bed and pulling it up around the leaves and stems. Try to hill before the stems grow too long and start to flop over. You should pull between 2”-6” new soil up around the plants each time you hill.

HARVESTING YOUR POTATOES

1) When buying your seed potatoes, make sure to check the recommended days to harvest for each variety. Some potato varieties will be ready to harvest in 60-70 days, while others will need 90-100 days to fully mature.

2) In general, potatoes are harvested after they go to flower and once the foliage begins to die back and turn brown. I’ll cover potato harvesting in more detail when that time comes this June!

I hope this is helpful! If you have any other questions about growing potatoes, feel free to send me a message. If you are short on garden space, you can also grow potatoes in grow bags! Here’s a tutorial if you’re interested in the grow bag method.

PS – CONGRATS to Stephanie Campbell, the winner of this month’s giveaway of a Cobra gardening tool!

Kitchen Notes

If you, like me, are constantly looking for recipes that feel and taste *special* but don’t require crazy ingredients or equipment or copious amounts of time to make – then THIS is going to be your new favorite recipe (adapted from Molly Baz’s cookbook, Cook this Book). All you do is roast a few sweet potato halves, then top it with a suuuuper simple + flavor-packed peanut-chile sauce and a little feta cheese and you’re golden. I could eat this dish as meal in itself over a bed of greens, but it also makes a great side to bring to a dinner party. Happy cooking!

Roasted Sweet Potatoes with Peanut-Chili Sauce & Feta

INGREDIENTS

  • 4 small sweet potatoes (about 2lbs total)

  • 1/2 cup plus 2 tablespoons olive oil

  • Kosher salt

  • 1/2 cup roasted, unsalted peanuts

  • 1 tablespoon honey

  • 1 teaspoon red pepper flakes

  • 1 teaspoon sweet paprika

  • 2 garlic cloves, minced

  • 2 limes

  • 4 ounces feta cheese, cut/crumbled into bite sized pieces (optional)

PREPARATION

  1. Preheat your oven to 425F.

  2. Roast the sweet potatoes: Cut the sweet potatoes in half lengthwise. Place on a rimmed baking sheet and drizzle with 2 tablespoons olive oil and season with 1.5 teaspoons salt, tossing with your hands to evenly coat. Arrange cut-sides down on your baking sheet. Transfer to the oven and roast until tender when pierced with a knife and charred on the undersides, 25-35 minutes. Transfer the roasted sweet potatoes to a platter.

  3. While the sweet potatoes roast, make the peanut-chile sauce: Roughly chop the 1/2 cup peanuts and place in a small pot and cover with 1/2 cup olive oil. Cook over medium heat, stirring often, until the peanuts are golden brown, 4-5 minutes. (A note that even after you turn off the heat, the oil will still be very hot, so if the peanuts are getting too brown, use a slotted spoon to scoop them out into a separate bowl until the oil cools a bit.)

  4. Add the honey, red pepper flakes, and paprika to the hot oil + peanut mixture and stir to combine. Allow the oil to cool for a few minutes then add the minced garlic (it will sizzle a bit, which is good.. the oil is gently cooking the garlic).

  5. Spoon the yummy peanut-chile sauce over your sweet potatoes, top with feta (if using), and a squeeze of lime. Enjoy!

Today’s Stats

  • Low temp: 59F

  • High temp: 76F

  • Sunrise: 7:23am

  • Sunset: 7:27pm

  • Moon phase: Full moon

  • Additional notes: Sunny and beautiful!

December 10

Farm Notes

The farm has officially been put “to bed” for the year and dang it feels good! Yesterday we finished cleaning up all the rows, putting away irrigation lines, etc – and then we covered everything up with our silage tarps. These tarps work wonders all winter long, as they smother any remaining weeds, the keep the soil warm and encourage biologic activity underground, and they keep the soil from running away due to winter winds and rain.

Before…

…and after!

Even though there are still a few weeks left in 2021, my mind is already focused on planning for our next season! In recent years, seed companies have been overwhelmed by the growing demand for seeds – which means it’s crucial to get your seed orders in early, or else your favorite varieties may sell out.

This week I placed my seed potato pre-order, which I source from our awesome local farm store. Based on the CSA survey that I sent out to our members, a LOT of people asked for more potatoes in their shares, so we’re definitely going to be scaling up our potato production next season!

Even if you don’t have much space, you can absolutely grow potatoes at home in grow bags – here’s a helpful video tutorial I found online if you’re interested in giving potatoes a try next season.

Listed below are the varieties we’re going to grow (along with info about the number of days from planting to harvest). And if you’re curious about all the nuances of the different varieties, here’s a great catalogue!

  • Dark Red Norland (55-75 days)

  • Red Pontiac (80-85 days)

  • Blackberry (80-90 days)

  • All Blue (100-110)

  • Gold Nugget (90-100 days)

  • German Butterball  (100-110)

  • Terra Rosa (90-100 days)

  • Austrian Crescent (110+ days)

  • Banana (110+ days)

Kitchen Notes

Now that the farm has pretty much been put to bed for the winter, I’ve got a lot more time on my hands to experiment more in the kitchen! Last week some friends got together for a taco party, and I was inspired to make this bright and citrus-y take on a slaw for the meal, and it was a hit! Don’t get me wrong, I love a good mayo-heavy slaw with a big plate of BBQ, but I’m digging how refreshing this slaw was, especially this time of year when I’m craving lots of crunchy + colorful veggies. The recipe below is very forgiving, so feel free to substitute other winter veggies you have on hand for the slaw, and if you don’t have lime or orange juice you can certainly use lemon juice instead.

Winter Slaw with Citrus Vinaigrette

INGREDIENTS

  • 1 medium green or red cabbage, shredded

  • 4-6 carrots, shredded or thinly sliced

  • 4-6 radishes, thinly sliced

  • 1/4 cup finely chopped scallions/green onions

  • 1/4 cup finely chopped parsley

  • 1/4 cup pepitas/pumpkin seeds (optional)

  • Zest and juice from 1 orange (about 1 teaspoon zest and 1/4 cup juice)

  • 1/4 cup fresh lime juice, from 2 limes

  • 2 tablespoons fresh orange juice

  • 1/3 cup olive oil

  • 1 clove garlic, minced

  • 1-2 tablespoons honey or maple syrup

  • 1-2 tablespoons dijon mustard

  • 1 teaspoon salt

  • 1/2 teaspoon freshly ground black pepper

INSTRUCTIONS

  1. Combine all of the veggies, fresh herbs, and pumpkin seeds (if using) in a large bowl.

  2. In a mason jar, combine the lime and orange juice, olive oil, minced garlic, honey or maple syrup, mustard, salt, and pepper and shake well to make the vinaigrette.

  3. Pour the vinaigrette over the veggies and use your hands to toss until well combined. If possible, dress the slaw at least 30 minutes before eating. Taste and adjust seasoning as needed – I often add a bit more lime juice and salt to give the slaw a bit more punch.

Today’s Stats

  • Low temp: 33F

  • High temp: 49F

  • Sunrise: 7:16am

  • Sunset: 5:03pm

  • Moon phase: Waxing Crescent

  • Additional notes: Clear and chilly

April 4

Farm Notes

It was a somewhat stressful weekend around here, as we had two nights in a row with temperatures below freezing, which meant we had to hustle around to cover nearly all our veggies to protect them from frost (the only things we didn’t cover were our alliums – garlic, onions, scallions, etc). While Thursday night ended up only getting down to about 30F, on Friday night it got down to the mid 20’s, and while most of our veggies fared alright, we did still get some frost damage in a few areas, which is a total bummer. Fingers crossed that this was the last hard freeze of the spring, because I really don’t want to have to get that row cover out again! Speaking of which, we buy big rolls of row cover from our local farm store, but if you’re looking for some frost protection for your home garden, here is a similar product to what we use that you can buy online (and that come in shorter lengths).

In other news, let’s talk potatoes! In this area, most people plant potatoes in mid/end of March. Keep in mind that potatoes are frost sensitive, so I’m actually glad that we were a little late getting our spuds in the ground this year, because the shoots still haven’t emerged above ground, which meant we didn’t have any frost damage during the past few chilly nights. so if you haven’t planted potatoes yet, now is the time!

IMG_4119.jpg

Here are some instructions and tips for planting potatoes:

BEFORE YOU PLANT

1) Source your seed potatoes from a reputable local farm/garden store. While you technically can plant potatoes from the grocery store, your best bet is to buy seed potatoes that are specifically bred to be used to for growing potatoes (as grocery store potatoes are often treated to prevent sprouting).

2) It’s recommended to “green sprout” your seed potatoes a 1-3 weeks before you plant them, which means putting your whole seed potatoes in a box and leaving them in a warm (70-85 F) and dark place to encourage their eyes to begin sprouting. Be careful when handling to avoid breaking off sprouted eyes.

3) If your potatoes are especially large (over 4 ounces) and have lots of eyes, you can cut them into smaller pieces, which allows you to get more out of each potato. Think of the size/weight of a chicken egg as your ideal size, and try to have at least 2 eyes per seed piece. If you are going to cut your potatoes, I recommend doing this the day before you plant, to allow the cut part of the potato to heal over.

IMG_3945.JPG

PLANTING YOUR POTATOES

1) Prepare the soil by adding compost and any other amendments to you bed. Dig a trench in your bed about 4”-6” deep.

2) Lay seed pieces eyes pointing up in the trench spaced 8”-12” apart for standard potato varieties and 12”-18” apart for fingerling varieties.

3) Cover potatoes with a few inches of soil, leaving a bit of a trench in the bed (because over time, you’ll want to “hill” your potatoes with additional soil from the sides of your trench).

TENDING YOUR POTATOES

1) Generally, potatoes need between 1-2 inches of water per week, which can be provided by rain or you to make up the difference.

2) You should “hill” your potatoes 2-3 times per season by loosening surrounding soil in the bed and pulling it up around the leaves and stems. Try to hill before the stems grow too long and start to flop over. You should pull between 2”-6” new soil up around the plants each time you hill.

After planting and covering your potatoes with soil, you should still have a bit of a trench in the bed, which will help with hilling the potatoes as they get larger over the next few months.

After planting and covering your potatoes with soil, you should still have a bit of a trench in the bed, which will help with hilling the potatoes as they get larger over the next few months.

HARVESTING YOUR POTATOES

1) When buying your seed potatoes, make sure to check the recommended days to harvest for each variety. Some potato varieties will be ready to harvest in 60-70 days, while others will need 90-100 days to fully mature.

2) In general, potatoes are harvested after they go to flower and once the foliage begins to die back and turn brown. I’ll cover potato harvesting in more detail when that time comes this June! If you have any other questions about growing potatoes, feel free to send me a message. :)

Kitchen Notes

As someone who loves to cook, but doesn’t love doing dishes / spending hours in the kitchen, I’m all about sheet-pan dinners (ie, when a protein and side dish can cook together at the same time on a sheet pan and voila! you’ve got dinner and only one pan to clean). Last night, we had a darn good sheet pan dinner, and I’m so excited to share the recipe, which is adapted from Food52. It’s for Harissa Chicken with Potatoes, Leeks & Herby Yogurt Sauce. It’s packed with bright Mediterranean flavors, takes only a few minutes to prep, cooks for about 45 minutes in the oven, and makes for a fabulous weeknight meal that also feels special enough for a weekend dinner party.

SHEET PAN HARISSA CHICKEN WITH POTATOES, LEEKS & HERBY YOGURT

IMG_4110.JPG

INGREDIENTS

  • 1.5-2 lbs pounds bone-in, skin-on chicken thighs

  • 2 lbs Yukon Gold potatoes, cut into 1” chunks

  • 3 teaspoons kosher salt, divided

  • 3/4 teaspoon freshly ground black pepper

  • 3 tablespoons harissa

  • 1 teaspoon ground cumin

  • 5 tablespoons extra-virgin olive oil, plus more as needed

  • 2-3 leeks, white and light green parts, halved lengthwise, rinsed, and thinly sliced into half-moons

  • Zest and juice of 1 lemon, divided

  • 1 cup plain Greek yogurt

  • 1 small garlic clove

  • 1/2 cup chopped soft fresh herbs such as dill, parsley, mint, and/or cilantro leaves

INSTRUCTIONS

  1. Heat the oven to 425°F.

  2. Combine the chicken and potatoes in a large bowl. Season them with 2½ teaspoons of the salt and ½ teaspoon of the pepper. In a small bowl, whisk together the harissa, cumin, and 3 tablespoons of the olive oil. Pour this mixture over the chicken and potatoes, and toss to combine.

  3. Arrange the chicken and potatoes in a single layer on a large rimmed baking sheet, and roast for 20 minutes.

  4. While the chicken and potatoes are roasting, combine the leeks, lemon zest, ¼ teaspoon of the salt, and the remaining 2 tablespoons olive oil in a medium bowl.

  5. After the chicken and potatoes have been cooking for 20 minutes, use a spatula to toss the potatoes lightly, then scatter the leeks over the baking sheet. Roast until the chicken is cooked through and everything is golden and slightly crisped, 20 to 25 minutes longer.

  6. While the chicken cooks, put the yogurt in a small bowl. Grate the garlic clove over the yogurt, add a handful of your chopped herbs and season with the remaining ¼ teaspoon salt, ¼ teaspoon pepper, and juice of your lemon. Taste and adjust seasoning as needed.

  7. To serve, you can spoon the yogurt over the chicken and veggies in the baking sheet, or you can transfer everything to serving platters/bowls. Scatter remaining herbs over everything, add a pinch (or two) of flakey sea salt, and drizzle with additional olive oil and/or lemon juice and enjoy!

Today’s Stats

  • Low temp: 43F

  • High temp: 74F

  • Sunrise: 6:59am

  • Sunset: 7:42pm

  • Moon phase: Waning Crescent

  • Additional notes: Sunny and beautiful all day.

Janaury 5

Farm Notes

I spent most of this cold and dreary day inside and got a few big things checked off my to-do list… one of which was ordering our seed potatoes for this season. I order seed potatoes from our beloved local farm supply store, Country Farm & Home in Pittsboro, and they source them from a reputable grower in Idaho, Grand Teton Organics.

These are our seed potatoes from last season.

These are our seed potatoes from last season.

I love growing potatoes (and by that, I mean I love digging them up and eating them..), and I maaay have gone a bit overboard with all the varieties for this year (7 in all!), with a mix of yukon gold-type potatoes, two red-skinned varieties, some gorgeous purple potatoes, and two types of fingerlings. We have 50 ft rows at our farm, and I usually allot about 8 lbs of seed potatoes per 50 ft bed (with an average of 12” spacing inside the row, though it varies depending on the variety). Here’s a rundown of the different potatoes we will be growing in 2021:

  • German Butterball

  • Gold Nugget

  • Red Johnny

  • Dark Red Norland

  • Purple Majesty

  • French Fingerling

  • Banana Fingerling

If you’re hoping to grow potatoes this year, here’s a great guide/FAQ sheet about growing spuds from the team at Country Farm and Home.

Tuesday frozen pizza + salad + wine night. :)

Tuesday frozen pizza + salad + wine night. :)

Kitchen Notes

If you know me, then you know I have a soft spot for frozen pizza, and you probably also know that Tuesday is our weekly frozen pizza night. This may surprise some of you, but here’s the deal… eating like a farmer doesn’t mean you have to whip up gourmet, scratch-made meals every night. To me, eating like a farmer means getting creative with the ingredients you have at hand, eating with the seasons whenever possible, and not making meals overly complicated. So for us, that means on Tuesday we have frozen pizza (our fav brand right now is Freschetta) and a big green salad with greens + veggies from the farm. I’m all about shame-free cooking + eating, so you do you! Whether it’s scratch-made, frozen, take-out, or something in-between, I think the most important thing is taking time to sit down and enjoy your meals with intention and gratitude, hopefully around a table with people you love.

Today’s stats

  • Low temp: 31F

  • High temp: 50F

  • Sunrise: 7:23am

  • Sunset: 5:13pm

  • Moon phase: Waning Gibbous

  • Additional notes: Frost in the AM, cold and cloudy most of the day.