Winter Squash Soup with Ginger, Lime & Coconut

Got winter squash? Run, don’t walk, and MAKE THIS SOUP.

This recipe is super straightforward, uses all easy-to-source pantry ingredients, and is packed with flavor thanks to warming fall spices, zesty ginger, bright lime juice, and cooling coconut milk. I used butternut squash most recently, but use whatever local winter squash you have access to – whether it’s pumpkin, acorn, kabocha, or funkier squash varieties like koginut.

wintersquashsoup-5.jpg

Roasted Winter Squash Soup with Ginger, Lime + Coconut

Author:

ingredients:

  • 3 lbs unpeeled winter squash (such as butternut, acorn, kabocha, etc)
  • Olive oil
  • 1 large yellow onion, diced
  • 1 tablespoon minced fresh ginger
  • 1 teaspoon ground coriander
  • 1 teaspoon ground cumin
  • ½ teaspoon turmeric
  • ½ teaspoon cinnamon
  • Pinch roasted red chili flakes
  • 4 cups vegetable stock or water
  • 1 teaspoon salt, plus more to taste
  • Freshly ground black pepper to taste
  • Juice of 1 lime (~3 tablespoons)
  • 1 14-oz can coconut milk
  • ¼ cup fresh basil leaves, plus more to garnish

instructions:

How to cook Roasted Winter Squash Soup with Ginger, Lime + Coconut

  1. Preheat the oven to 425°F.
  2. Peel the butternut squash and dice the flesh into ½” pieces. Toss the diced squash on a rimmed baking sheet with a few tablespoons of olive oil and a pinch of salt.
  3. Roast for 30-35 minutes, until the squash is soft and beginning to caramelize. Set aside.
  4. Heat 1 tablespoon olive oil in saucepot or dutch oven over medium heat. Add diced onion, a pinch of salt and cook until onions are soft and translucent, about 8 minutes.
  5. Add ginger, coriander, cumin, turmeric, cinnamon and chili flakes, and cook for another 2 minutes, stirring frequently.
  6. Add the cooked butternut squash, along with the vegetable stock or water, salt and pepper.
  7. Bring to a boil, then reduce heat to simmer and cook for 10 minutes.
  8. Stir in the lime juice and coconut milk, and simmer for another 2 minutes. Take the soup off the heat and add the fresh basil.
  9. Use blender to carefully puree soup in 2 or more batches, until smooth.
  10. Return soup to pot over low heat. Taste and adjust seasoning to balance the salty, pungent and citrus notes. Ladle into bowls and garnish with creme fraiche, toasted squash seeds, fresh herbs or anything else that inspires you. Enjoy!
Created using The Recipes Generator

Blueberry-Ginger Galette with Pecan Crust

A galette, aka a rustic pie, is the ideal vehicle for containing ripe, juicy, sweet summer fruits for a perfectly imperfect dessert. Use this recipe as a guide for whatever fruits you have on hand – raspberries, blackberries, cherries, peaches, pluots, etc – don’t overthink this folks. Galettes are best after sitting for several hours or overnight (allowing all those juices to settle and firm up a bit), so they’re a great make-ahead dessert for summer dinner parties. All you need is a scoop of vanilla ice cream (or whipped cream or creme fraiche) to top it all off!

galette-6.jpg

Blueberry-Ginger Galette with Pecan Crust

Author:
Recipe adapted from Bon Appetit.

ingredients:

Pecan Galette Dough
  • ½ cup pecans
  • 1 cup plus 2 tablespoons all-purpose flour
  • 2 teaspoons sugar
  • ½ teaspoon kosher salt
  • ¼ teaspoon ground cinnamon
  • ½ cup (1 stick) chilled unsalted butter, cut into pieces
Blueberry Filling
  • 12 ounces blueberries (about 2 cups)
  • 1 tablespoon tapioca flour (or cornstarch)
  • 2 teaspoons fresh lemon juice
  • 1/2 teaspoon grated fresh ginger (or more, if you really like ginger)
  • 1/3 cup sugar, plus more for sprinkling
  • All-purpose flour (for surface)
  • 2 tablespoons half-and-half or heavy cream

instructions:

How to cook Blueberry-Ginger Galette with Pecan Crust

Make the dough
  1. Preheat oven to 350°. Toast pecans on a rimmed baking sheet, tossing once, until fragrant and slightly darkened, 10–15 minutes; let cool. Pulse pecans in a food processor until the consistency of coarse meal. 
  2. In the same food processor as the ground pecans, add flour, sugar, salt, and cinnamon and pulse just to combine. Add cold, chopped butter and pulse until mixture resembles coarse meal with a few pea-size pieces remaining. Drizzle with 4 tablespoons ice water and pulse a few more times to mix. 
  3. Transfer the dough to a large bowl and mix quickly with your hands, adding another tablespoonful of water if needed, just until the dough comes together in a ball. Pat dough into a 6"-diameter disk, wrap in plastic wrap, and chill for at least 30 minutes.  
Filling and Assembly
  1. Preheat oven to 375°. Toss blueberries, tapioca flour (or cornstarch), lemon juice, grated ginger (I use a microplane to grate ginger) and 1/3 cup sugar in a large bowl.
  2. While the berries macerate in their juices, roll out the chilled dough on a lightly floured piece of parchment paper to a 12" round, 1/8" thick. Carefully transfer the parchment paper with the rolled-out dough onto a baking sheet. Mound the blueberries in center of the dough, leaving a 2" border. Carefully lift and fold the edges up and over the filling, allowing the dough to naturally pleat at 1-2 inch intervals as you fold. Brush dough with cream and sprinkle with sugar.
  3. Bake galette until crust is dark golden brown and filling is bubbling, 45–55 minutes total, rotating the pan halfway through baking. Allow to cool before enjoying. Just before serving, top with scoops of your favorite vanilla ice cream, whipped cream, or creme fraiche for the ultimate galette experience.
Created using The Recipes Generator

Pickled Peaches

I’ll be honest – the first time I made pickled peaches, I was very skeptical (and you probably are too). Alas! I’m so glad that I persevered, because these lovelies are nothing like the mushy, slimy, overly sweet peaches that come from a can at the store. Homemade pickled peaches strike the perfect balance of sweet, tangy, and a little bit of spice – they are delicious spooned over ice cream, dropped in a glass of sparkling wine/water, served in a salad or alongside sandwiches, or better yet – just eaten straight from the jar. These are 'refrigerator' pickles, so there's no need to deal with hot water bath canning, and they store in your fridge for ~1 month - so it’s a great way to extend the life of your stone fruit. Keep scrolling for the recipe, which was adapted from chef Damaris Phillips’ recipe.

F8FD0F89-0E50-4DF7-A53A-5614AE464408.JPG

Quick Pickled Peaches

Yield: 1 quart-sized jar, or 2 pints
Author: Michelle Aronson, Farmbelly

ingredients:

  • 1 1/4 cups rice wine vinegar
  • 1/3 cup honey
  • 1/3 cup sugar
  • 1/2 teaspoon pumpkin pie spice
  • 1-inch chunk ginger, peeled and chopped
  • 2 pounds peaches (about 6-7 peaches), peeled, pitted and quartered

instructions:

How to cook Quick Pickled Peaches

  1. To peel the peaches, make sure they are ripe (but not too soft). Cut a shallow cross in skin at blossom end of each peach. Plunge the peaches, a few at a time, into large pot of boiling water for about 30 seconds. Transfer fruit to bowl of ice water until cool enough to handle, then strip away skins using your fingers (use paring knife for any stubborn bits). Cut the peeled peaches into quarters or 1/2" thick slices.
  2. In a saucepan over medium heat, combine the vinegar, honey, sugar and pumpkin pie spice. Heat and stir until the sugar dissolves, 2 to 3 minutes. You do not want this to get too hot or it will over-cook the peaches.
  3. Put the ginger in the bottom of a 1-quart mason jar, then fill with the peeled peaches. Pour the liquid over the peaches, leaving 1/2" of head space. All to cool, seal, and store in the refrigerator. They will be ready to eat in a few days, and will last in the fridge for 1 month.
Created using The Recipes Generator

Shaved Summer Squash with Herbs, Lemon & Parmesan

This is a quick, colorful salad made for hot summer days when zucchini is flowing from the garden (and when you don’t want to heat up the kitchen by turning on the oven or stove). For this recipe, it’s best to use small to medium sized squash, as larger squash will have tougher skin and larger seeds. This recipe is lightly adapted from my favorite new cookbook – 'Ruffage' by Abra Berens. Abra has a background as a farmer, she got her culinary training at Ballymaloe (which where I also attended culinary school), and today she is the chef at Granor Farm in Three Oaks, Michigan. Ruffage is an ode to vegetables and all their nuances, and this cookbook will give you the tools + practical know-how to bring out the best in your vegetables. Keep reading for the full recipe!

Shaved Summer Squash with Herbs, Lemon & Parmesan

Yield: Serves 4
Author:
prep time: cook time: total time:
This is a quick, colorful salad made for hot summer days when zucchini is flowing from the garden, and you don’t feel like turning on your oven or stove! For this recipe, it’s best to use small to medium sized squash, as larger squash will have tougher skin and larger seeds. This recipe is lightly adapted from the cookbook 'Ruffage' by Abra Berens.

ingredients:

  • 2-3 summer squash, shaved thinly into 1/8" slices
  • 1 cup assorted coarsely chopped herbs
  • 4 oz Parmesan cheese, peeled into ribbons
  • 1 teaspoon kosher salt
  • 1/2 teaspoon freshly ground black pepper
  • Between 1/4 - 1/2 cup olive oil
  • 2 tablespoons lemon juice

instructions:

How to cook Shaved Summer Squash with Herbs, Lemon & Parmesan

  1. Toss together the shaved squash, chopped herbs, Parmesan ribbons, salt + pepper, 1/4 cup of the olive oil, and the lemon juice. 
  2. Taste and adjust the seasoning, adding more olive oil and/or lemon juice as needed to make it well dressed and flavorful. 
  3. Serve within the next 30 minutes. If serving later, shave the zucchini in advance but dress just before serving. 
Created using The Recipes Generator

Quick Pickles 101

If you’re feeling guilty about the random carrot, extra bits of broccoli, handful of cauliflower, and/or the half onion abandoned in your fridge, there’s a delicious (and super easy) solution to reducing food waste at home… quick pickles!

Quick pickles are packed with flavor, and they extend the life of your veggies for up to a month.  A basic pickling brine consist of four basic ingredients: VINEGAR for acidity, WATER to cut the the acid, SUGAR to balance the acid, and SALT for flavor. You can mix and match different vegetables (and fruits) to be pickled, and as you’ll see in the recipe below, you can (and should!) pickle parts of vegetables that usually get thrown away, like the stems. Get creative with aromatics as well – everything from lemon peels to toasted spices, garlic, ginger, and herbs will add heaps of flavor to your colorful jars of quick pickles. Just get creative and use whatever you have on hand… it’s what eating like a farmer is all about.

rainbowchardstems.jpg

Quick Pickles 101

Yield: Makes 2 pint-sized jars of quick pickles
Author:

ingredients:

  • 1 pound of assorted fresh, seasonal vegetables
  • Optional seasonings: fresh herbs, whole spices, garlic, lemon zest, ginger
For the brine
  • 1 cup vinegar (you can use distilled white, apple cider, rice wine, etc)
  • 1 cup water
  • 1 tablespoon kosher salt
  • 2 tablespoons sugar

instructions:

How to cook Quick Pickles 101

  1. Wash your mason jar and lid in hot soapy water, rinse and let air dry.
  2. Combine the brine ingredients in a saucepan over high heat. Bring to a boil, stirring to dissolve the salt and sugar, then set aside to cool slightly.
  3. While the brine cools, wash your vegetables and cut into desired shapes/sizes. Keep in mind the smaller/thinner you cut the veggies, the more quickly the brine will penetrate. 
  4. Pack the vegetables and any herbs/ spices/aromatics in the jars, making sure there is a ½” of space from rim of the jar to the tops of the vegetables.
  5. Fill each jar to within ½” of the top with the slightly cooled brine. This recipe makes enough brine for 1 quart (or two pints) of quick pickles.
  6. Gently tap the jars against the counter to remove air bubbles. Top off with more brine if needed. Screw on lids until the rings are tight.
  7. Let the jars cool to room temperature. Store the pickles in the fridge. These will taste good after 24 hours. Enjoy for up to one month!
Created using The Recipes Generator


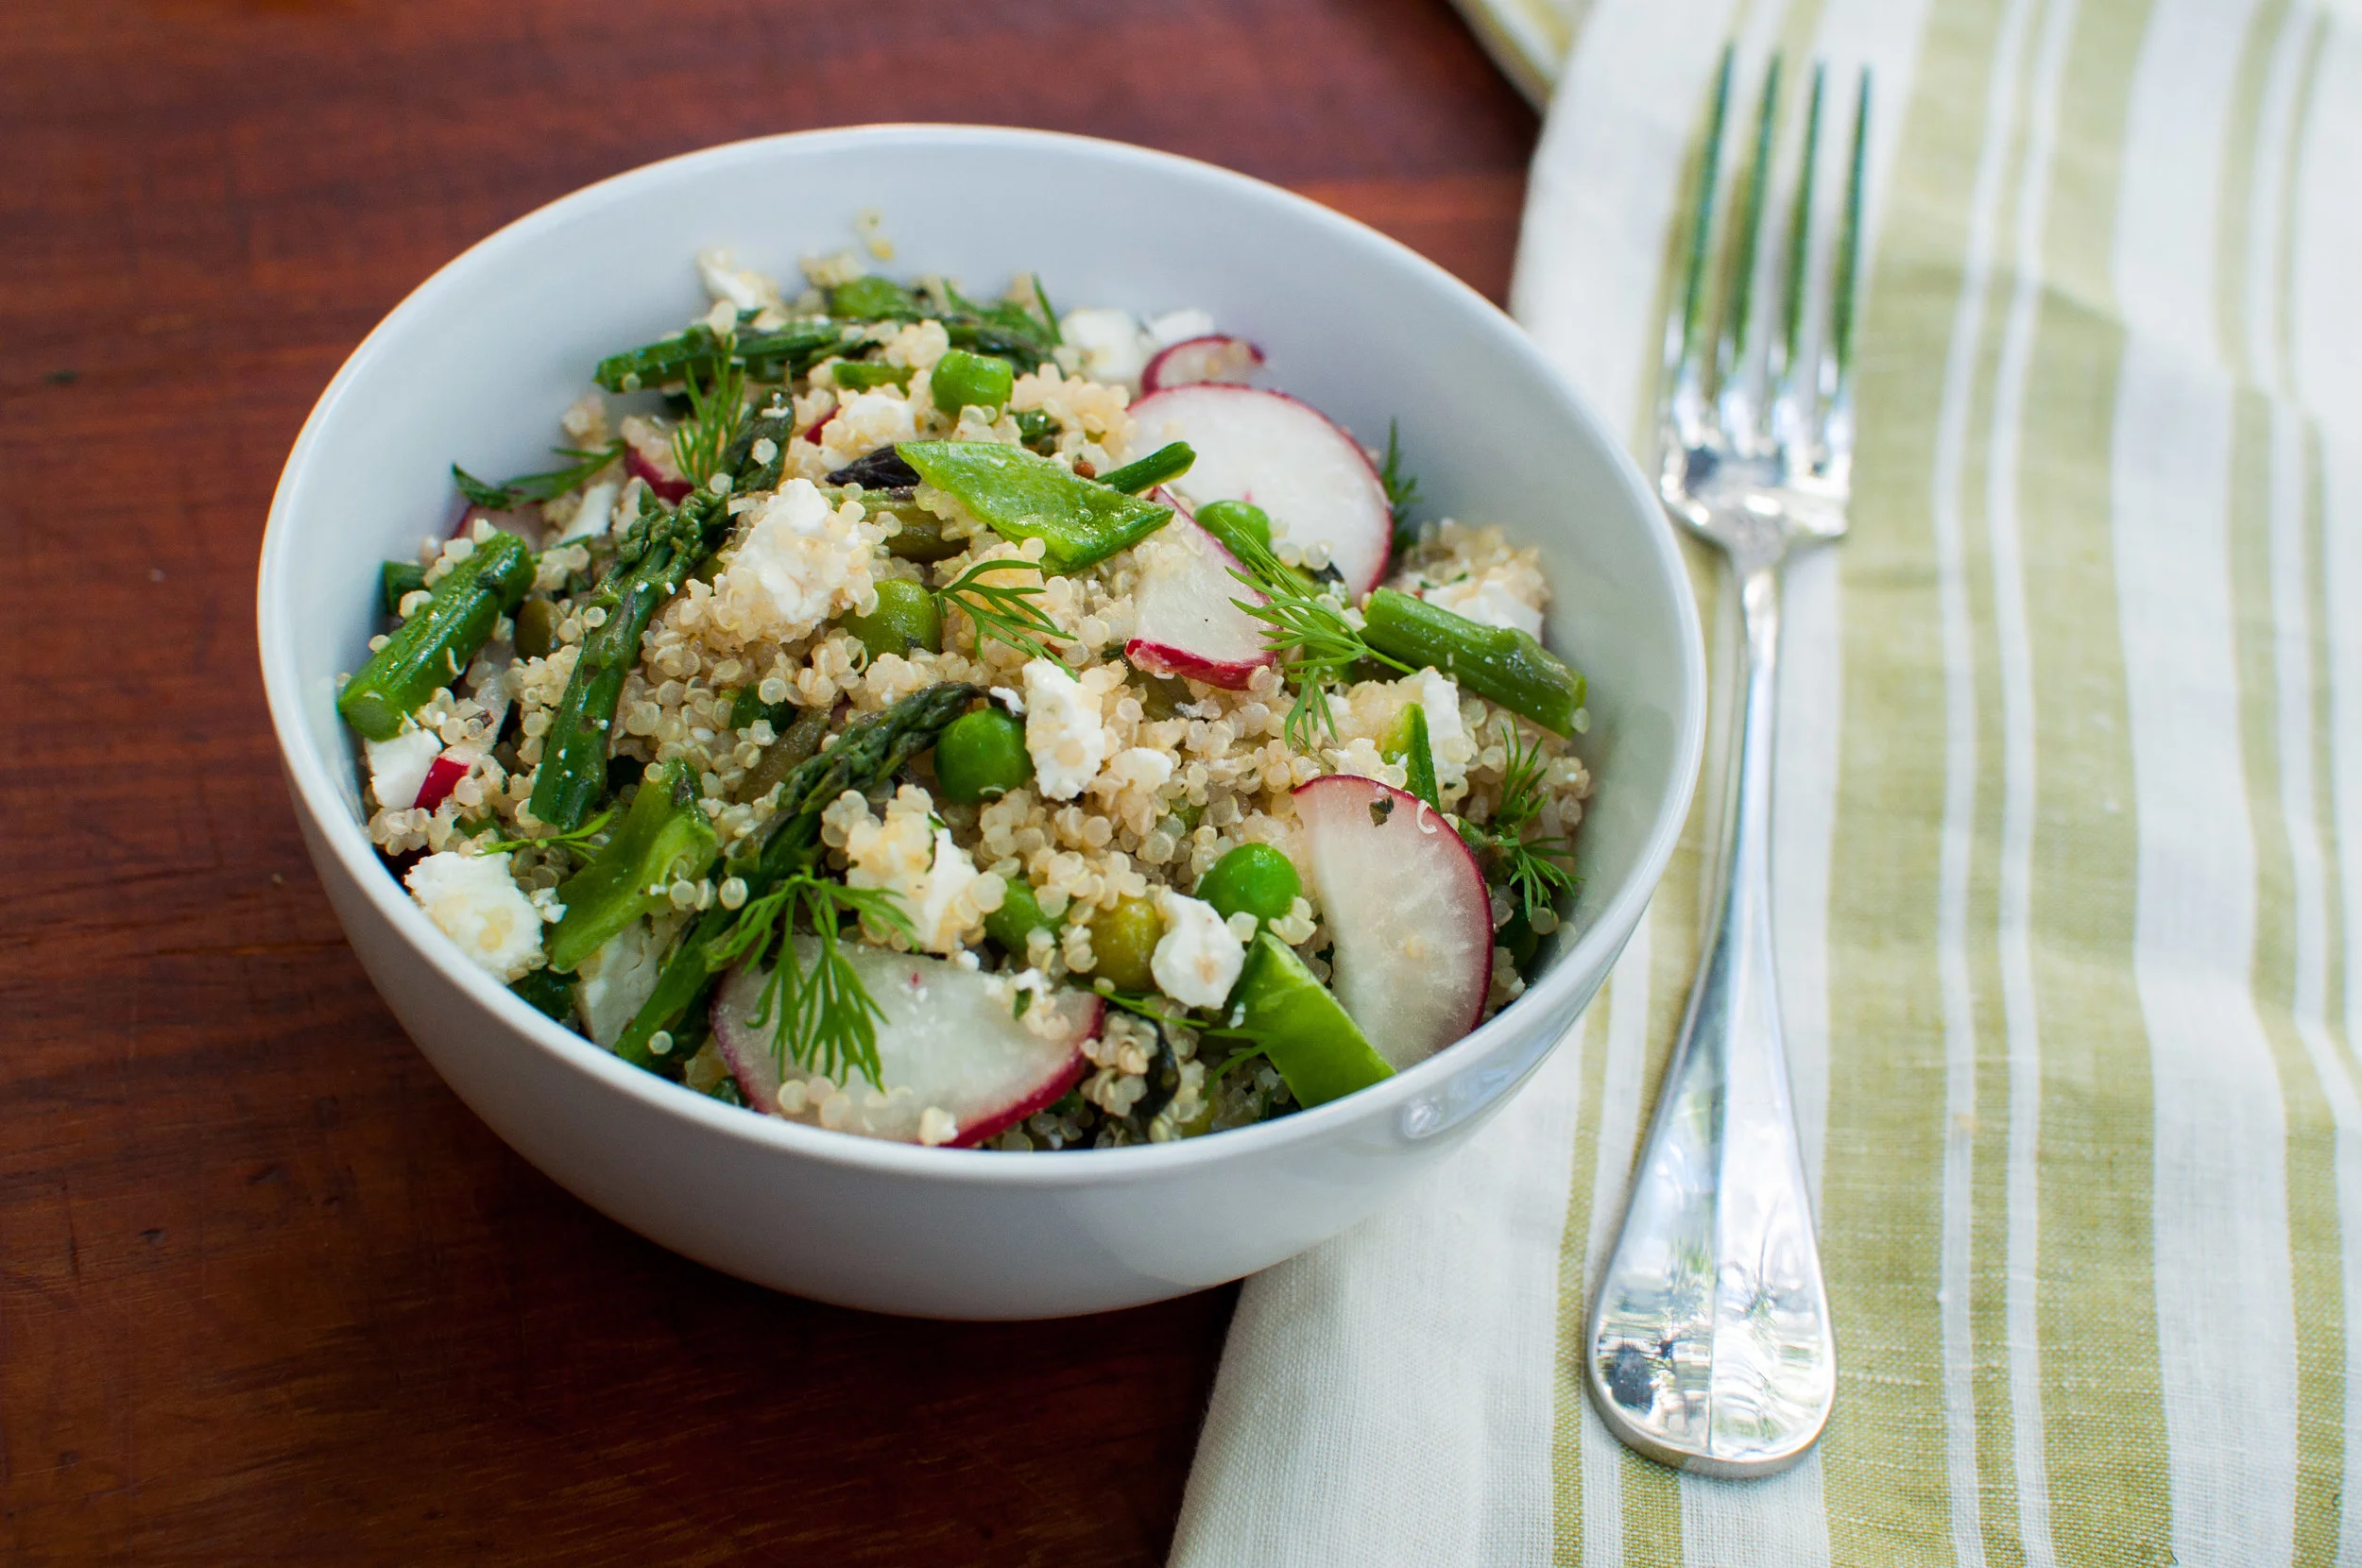
Spring Tabbouleh Salad

This salad is a spring-time riff on my Summer Quinoa Tabbouleh, and holy guacamole… it is so. freaking. good. Maybe it’s just because I’ve been eating kale and root vegetables all winter long, and this salad embraces all the bright, vibrant + colorful veggies of spring that I’ve been craving… all I know is I’ve been eating it for breakfast, lunch, and dinner (not even kidding) and I’m also not complaining one bit.

Instead of cherry tomatoes, corn, and avocado (which are in the summer version of this recipe) I subbed in local asparagus, radishes, and peas. Instead of basil, I chopped up heaps of mint, dill and parsley from the farm where I work. This is one of my go-to salads to make ahead and portion out for a few lunches or dinners, because it’s super hearty and stays fresh + crisp in your fridge for days and days. See below for the full recipe.

Spring Tabbouleh Salad by Farmbelly

Spring Tabbouleh Salad

Author:

ingredients:

For the salad
  • 2 cups quinoa
  • 3 cups water
  • 1/2 teaspoon kosher salt
  • 1 bunch asparagus, chopped into 1 inch pieces
  • 1 cup green peas (fresh or frozen)
  • 1/2 cup sliced sugar snap or snow peas
  • 4-5 radishes, thinly sliced
  • 3 scallions/green onions, thinly sliced
  • 1/4 cup toasted pepitas/pumpkin seeds
  • 1/4 cup chopped fresh Italian parsley
  • 1/4 cup chopped fresh mint
  • 2 tablespoons chopped fresh dill
  • 4 ounces feta cheese, diced (optional)
For the lemon vinaigrette
  • 1/4 cup freshly squeezed lemon juice
  • 1/2 cup good olive oil
  • 1 tablespoon dijon mustard
  • 1 tablespoon honey
  • 1 garlic clove, minced
  • Kosher salt
  • Freshly ground black pepper

instructions:

How to cook Spring Tabbouleh Salad

  1. Pour 3 cups of water into a medium saucepan and bring to a boil. Stir in the quinoa, lower the heat and simmer, covered, for 15 minutes. Turn off the heat and allow quinoa to steam with the lid on for 5 minutes, then uncover and fluff with a fork. Transfer quinoa to your salad bowl.
  2. While the quinoa is cooking, blanch asparagus in a large pot of salted boiling water for about 1 minute, then add the peas and cook for another 30 seconds. Drain and immerse the asparagus and peas in a cold water bath. Drain once more and dry the blanched vegetables by laying them out on a clean kitchen towel.
  3. While the asparagus and peas are drying, make the lemon vinaigrette: Simply combine all the vinaigrette ingredients in mason jar and shake well. Taste and adjust seasoning as needed.
  4. Add the blanched veggies to the salad bowl with the cooked quinoa. Add the sliced sugar snap peas, radishes, green onions, chopped herbs, pepitas, feta cheese (if using) and pour over the vinaigrette (using only as much vinaigrette as you need), gently stirring everything together.
  5. Taste and adjust seasoning as needed (such as adding a bit more salt or lemon). This bright, hearty salad keeps very well in the fridge for several days.
Created using The Recipes Generator

Compound Herb Butter

If you ask me, butter makes everything better. This is especially true when you add fresh herbs + aromatics to the mix, then slather it onto toasted bread or use it as a simple, seasonal sauce atop grilled vegetables, sizzling steaks and seafood. The flavor combinations for herb butters are literally endless – see below for several suggested flavor pairings – and it comes together in less than five minutes. Keep scrolling for the recipe – which, to be honest, is less of a recipe and more of a general guide, so use your imagination!. A quick note when it comes to buying butter… I typically buy Kerrygold salted butter (because let’s be real, salt = yum). The only time I buy unsalted butter is if I’m baking, as most recipes for cakes, cookies, etc call for unsalted. Also! If you’re dairy free, you can totally hop on the herb butter train – use this exact same recipe/technique and substitute with your favorite brand of dairy-free butter.

TRIED & TRUE HERB BUTTER VARIATIONS:

  • Fresh Summer Flavor: Basil, Chives, Parsley, Lemon Zest

    • Delicious paired with fresh vegetables, warm crusty bread, fresh fish

  • Classic Gremolata: Parsley, Garlic, Lemon Zest

    • Pairs well with roasted asparagus, grilled salmon, steak

  • Savory & Rustic: Rosemary, Thyme, Sage, Garlic

    • Pairs well with roasted root vegetables, potatoes, and roasted pork

  • Refreshing & Bright: Mint, Parsley, Lemon Zest

    • Pairs beautifully with with lamb

  • Cilantro-Lime: Cilantro, Lime Zest, Garlic

    • Perfect for Mexican-inspired fish or steak, or grilled corn on the cob

  • Cherry Tomato Basil Butter: Basil, Chopped Sun-dried Tomatoes

    • Delicious on toasted baguettes, steamed fish, sautéed vegetables

herbbutter-7.jpg

Compound Herb Butter

ingredients

  • 1 stick (1/2 cup) unsalted butter, softened
  • 1/2 cup chopped assorted fresh herbs
  • 1 lemon, zested (optional)
  • 1 garlic clove, minced (optional)
  • Kosher salt and freshly ground pepper, to taste

instructions

  1. First, make sure that your butter is very soft to the touch.
  2. Use a rubber spatula to whip the softened butter together with the herbs (along with the lemon zest + garlic, if using) in a bowl. 
  3. Add a pinch of salt and pepper and stir to combine. Taste and adjust seasoning as needed.
  4. The compound butters can be refrigerated for up to 2 weeks, and will last in the freeze for up to 6 months.

NOTES:

See notes above for suggested herb/flavor combinations.
Created using The Recipes Generator

Spring Greens Soup with Roasted Fennel & Cauliflower

As we – ever so slowly, but surely – emerge from the depths of winter, I’m craving anything + everything GREEN. Which is why I recently went searching for a Spring Greens soup recipe that actually tasted good (i.e., not like celery juice). After lots of trials and tweaking, I’m excited to share a recipe that’s lightly adapted from the blog Kale & Caramel. The original version of this soup features roasted fennel, which I love, so I’ve gone a step further and added roasted cauliflower for extra body and sweet, caramelized goodness.

So while this 100% plant-based soup definitely falls into the “healthy” category – it’s seriously bursting with flavor thanks to all the sweet roasted veggies, bright acidity from lemon juice + zest, zippy greens and vibrant herbs. It may seem like a lot of ingredients, but I’ll bet they are things you already have on hand – and if not, everything can be easily sourced.

Yield: 4-6

Spring Greens Soup with Roasted Fennel & Cauliflower

A colorful and comforting spring soup featuring vibrant greens and sweet roasted fennel + cauliflower. Adapted from the blog Kale & Caramel.

prep time: cook time: total time:

ingredients

Roasted Fennel & Cauliflower
  • 4 cups sliced fennel bulb, green fronds reserved
  • 4 cups coarsely chopped cauliflower
  • 4 tablespoons olive oil
  • 1/4 teaspoon sea salt
  • 1/4 teaspoon fennel seeds (optional)
  • fresh ground pepper, to taste
For the Soup
  • Roasted fennel and cauliflower, from above
  • 2 cups diced yellow onion
  • 2 tablespoons olive oil
  • 1/4 teaspoon sea salt
  • Freshly ground pepper, to taste
  • 2 teaspoons minced garlic
  • 6 cups vegetable broth
  • 1 lemon, zested and juiced
  • 6 cups spinach
  • 1 cup arugula
  • 1 cup fennel fronds
  • 1/2 cup roughly chopped chives
  • 1/4 cup roughly chopped mint
  • 1/4 teaspoon sea salt, plus more to taste
Toppings (optional)
  • Thinly sliced radishes
  • Carrot top gremolata (see recipe here)
  • Fennel fronds
  • Drizzle of olive oil

instructions

Roasted Fennel & Cauliflower
  1. Preheat the oven to 400ºF. Line a rimmed baking sheet with parchment paper or foil.
  2. Lay the sliced fennel and chopped cauliflower on the baking sheet in an even layer, and drizzle with olive oil and sprinkle with salt, pepper, and fennel seeds (if using). Toss gently to coat the mixture evenly. Roast for 30-35 minutes until tender and beginning to brown. Flip the vegetables halfway through roasting to ensure even browning. 
For the Soup
  1. Heat the olive oil in a large pot or dutch oven over medium heat. Add the diced onion, salt and pepper and sauté until golden brown, stirring occasionally. 
  2. Add the garlic and stir another minute. Add the vegetable broth, lemon zest + lemon juice, as well as the roasted fennel + cauliflower and bring the mixture to a simmer. Simmer gently for 10 minutes.
  3. Remove the pot from heat, add the spinach, arugula, fennel fronds, chives and mint. Stir to submerge in the soup, cover, and let the greens to wilt in the heat of the broth for a few minutes.
  4. Transfer the whole pot of ingredients to a high speed blender and blend until completely smooth (you'll likely need to do this in batches). Return to the pot, taste, and add more salt and pepper as needed. 
  5. Garnish with an assortment of sliced radishes, a drizzle of olive oil, fennel fronds, etc. A topping of crunchy pistachio + carrot top gremolata is especially lovely. 
Created using The Recipes Generator

Roasted Root Vegetable Buddha Bowl with Ginger Tahini Sauce

I ought to admit from the start that this is a no-recipe kinda recipe. The art of the buddha bowl is more of a basic technique rather than an exact science, giving you the freedom to experiment + use whatever ingredients you have on hand. The key is taking an hour or two each week to prep these components: roast up some spiced veggies while making a big pot of brown rice, have some greens and beans at the ready, whip up a quick sauce, and voila! You’ve got the makings of a gosh darn good meal. While there’s no official definition of a buddha bowl, in our kitchen they typically consist of a few key components, which can all be prepped ahead of time and assembled on the fly:

  1. Dark leafy greens

  2. Healthy whole grains (such as brown rice)

  3. Cooked pulses/legumes (lentils, chickpeas, black beans)

  4. Assorted roasted and/or raw vegetables

  5. A delicious sauce

  6. Some crunchy seeds + fresh herbs

Today I’m sharing a basic buddha bowl “recipe” featuring roasted root veggies and a fabulous ginger-tahini sauce – keep scrolling for the low-down on how it’s done!

buddhabowl-2.jpg

Roasted Root Vegetable Buddha Bowl with Ginger Tahini Sauce

ingredients

For the Buddha Bowl
  • 3 lbs root vegetables (ex: carrots, sweet potatoes, beets), chopped to 1/2” dice
  • 4 cloves of garlic, peeled
  • 2 tablespoons olive oil
  • 1 tablespoon apple cider vinegar
  • 1 teaspoon garam masala
  • Kosher salt & freshly ground pepper, to taste
  • 2-3 cups assorted greens (ex: spinach, kale, arugula)
  • 2-3 cups cooked whole grain (ex: rice, quinoa, barley, millet)
  • 2-3 cups cooked pulse (ex: lentils, black beans, chickpeas, lentils)
  • Ginger Tahini Sauce (see recipe below)
  • Handful pumpkin seeds/pepitas
  • Fresh chopped herbs (ex: parsley, mint, basil)
Ginger Tahini Sauce
  • 2 cloves garlic
  • 1/3 cup tahini
  • 1/4 cup peanut or almond butter
  • 1/4 cup rice vinegar
  • 2 tablespoons white miso (can omit if needed)
  • 2 tablespoons maple syrup
  • 1 tablespoon gluten free liquid aminos
  • 1 teaspoon grated fresh ginger
  • 1/4 teaspoon red pepper flakes
  • 1/4 cup water + additional to thin if necessary

instructions

  1. Preheat oven to 425°F and line a rimmed baking sheet with foil or parchment paper.
  2. Toss the chopped root vegetables in a large bowl with a few tablespoons of olive oil, a splash of apple cider vinegar, kosher salt, pepper, and 1 teaspoon garam masala (or any spice combo of your choice).
  3. Pour the vegetables out onto a baking sheet in a single layer (use two trays if needed). Bake in the oven for 30-40 minutes, or until tender and beginning to brown. Turn the vegetables over halfway through to prevent burning. 
  4. While the vegetables are roasting, prepare the Tahini Sauce: Simply add all the sauce ingredients to a small food processor and blend until smooth and creamy. Taste and adjust seasoning as needed. If the sauce is too thick, simply add a bit more water. 
  5. To prepare the buddha bowls: In each person's bowl (or in one big bowl) start with a base of mixed greens. Add a scoop of your cooked whole grain and pulse/beans to each bowl, and top everything with a generous scoop of roasted vegetables. Drizzle with the Tahini Sauce and finish with a flourish of seeds (I love pumpkin seeds/pepitas) and chopped fresh herbs.
Created using The Recipes Generator

Herbed Beet Fritters with Lemon-Herb Cashew Cream

The next time you have extra beet roots hanging around, I highly recommend that you whip up these herb-filled beet fritters, topped with a bright (not to mention dairy free) lemon-herb cashew cream sauce. Once you’ve mastered this technique of making vegetable fritters, get creative and swap out the grated beets for other veggies like carrots, zucchini and kohlrabi. This 100% plant-based recipe makes for an awesome appetizer, a colorful veggie side, and can even serve as a vibrant vegetarian main dish. This recipe was adapted from one of my very favorite farmers + amazing cooks, Andrea Bemis, and her cookbook + blog Dishing Up the Dirt.

beetfritters-2.jpg

Herbed Beet Fritters with Lemon-Herb Cashew Cream

prep time: cook time: total time:

ingredients

Herbed Beet Fritters
  • 2 cups shredded beets (from 2-3 beet roots)
  • 2 tablespoons minced mint
  • 2 tablespoons minced parsley
  • 2 tablespoons minced dill
  • 1/2 cup diced red onion
  • 1/2 teaspoon fine sea salt, plus more to taste
  • 1/2 cup chickpea flour
  • 1/2 teaspoon cumin
  • 2 flax eggs (2 tablespoons ground flax stirred into 6 tablespoons water)
  • 3-4 tablespoons coconut oil
  • Flaky sea salt and minced fresh herbs, optional garnish
Cashew Cream
  • 1 cup raw cashews, soaked for 30 mins in boiling hot water
  • 1/2 cup water
  • 3 tablespoons fresh lemon juice
  • 2 tablespoons extra virgin olive oil
  • 2 tablespoons chopped fresh mint
  • 2 tablespoons chopped fresh parsley
  • 2 tablespoons chopped fresh dill
  • 2 cloves of garlic, minced
  • Kosher salt and freshly ground black pepper

instructions

  1. For the Cashew Cream Sauce: Drain and rinse the soaked cashews. Add them into a food processor along with with 1/2 cup water, lemon juice, oil, mint, parsley, dill, and garlic. Process until completely smooth and creamy. If the sauce seems too thick add a bit more water. Taste and add kosher salt and pepper to taste. 
  2. Make ahead the flax eggs for the Beet Fritters: Combine 2 tablespoons of ground flax in a small bowl with 6 tablespoons water. Whisk to combine and allow to thicken for 5-10 minutes in your fridge. 
  3. In a large bowl combine the grated beets, mint, parsley, dill, red onion, salt, chickpea flour, and cumin. Add the flax eggs and mix well. Taste and adjust seasoning as needed. 
  4. Heat a few tablespoons of coconut oil in a large non-stick skillet over medium-high heat. Scoop the beet mixture into roughly 1/4 cup portions and lightly flatten them into patties. Cook for 2-3 minutes per side, until golden brown. Cook the fritters in batches, adding more coconut oil to the skillet as needed. 
  5. Serve with a dollop of the Cashew Cream Sauce, a pinch of flaky sea salt, and a sprinkling of fresh herbs.
Created using The Recipes Generator