January 21

FARM NOTES

Alright y’all, the blueberries are officially (finally) in the ground! It was a long day, and every muscle in my body is aching, but hot dang it we got it done. As I’ve mentioned in earlier entries, this is my first time really working with blueberries, so I did a lot of research and asked a lot of questions to make sure I didn’t f*ck it up. And so, hopefully any of you who would like to plant blueberries in the near future (whether it’s just one bush or a whole field of them) will find this info useful… keep scrolling for photos + explanations for how it all went down:

First things first, you gotta dig some holes. Each hole was (roughly) 18” deep and 2 feet wide. Next, we refilled each hole about halfway (so 9-10”) with 1/3 compost, 1/3 peat moss (to lower the pH in the soil), and 1/3 native soil (that was displaced when we dug the hole).

Holes dug 18” deep and 2 ft wide.

Holes dug 18” deep and 2 ft wide.

Each hole refilled halfway up with 1/3 compost, 1/3 peat moss, 1/3 native soil

Each hole refilled halfway up with 1/3 compost, 1/3 peat moss, 1/3 native soil

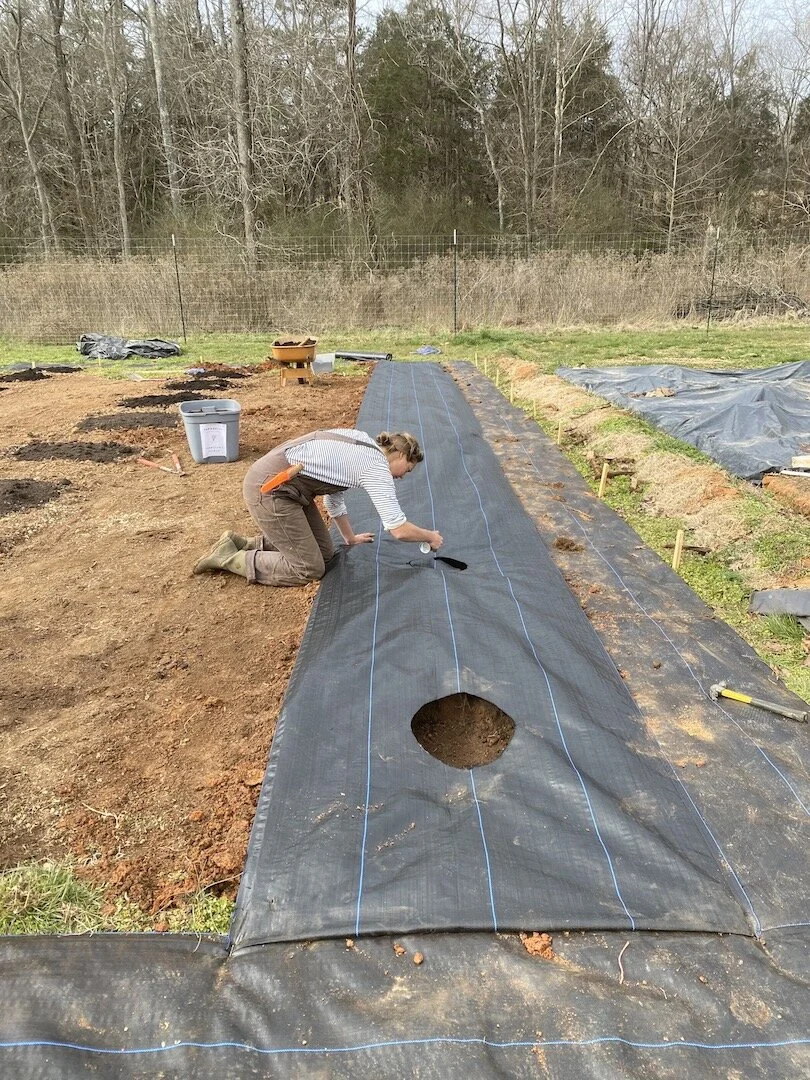
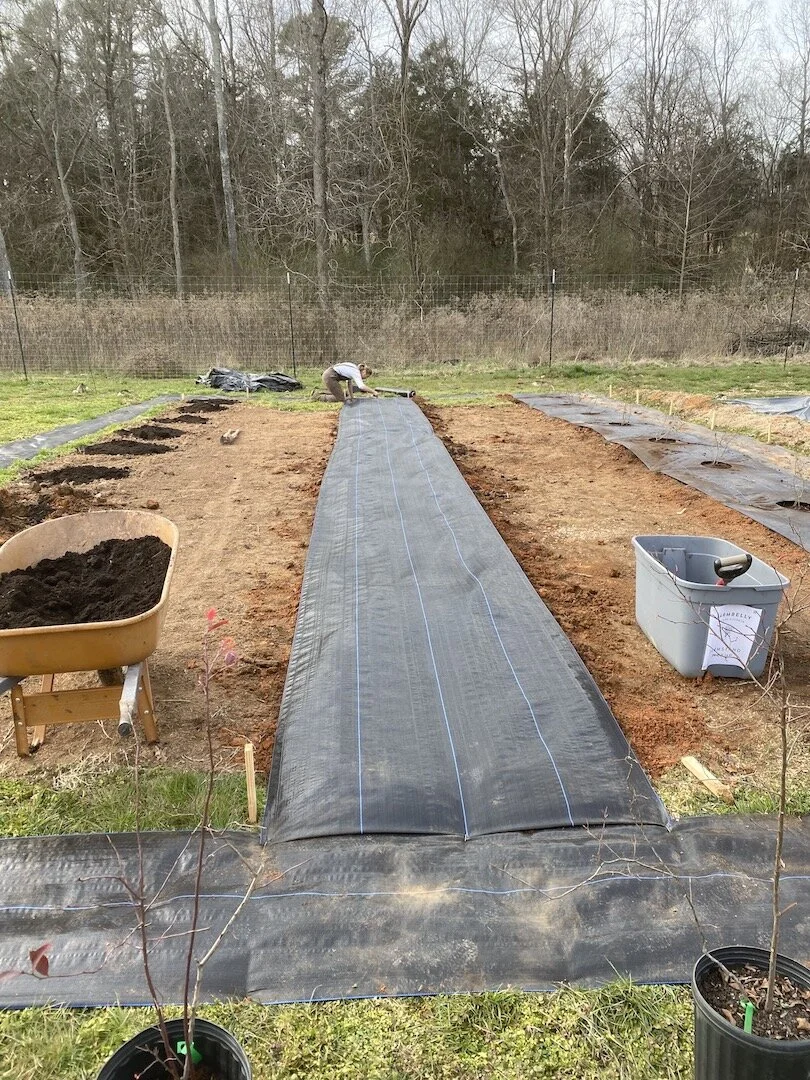
Next, we laid down a 4 ft wide strip of landscape fabric and stapled it down at the ends of the row. We decided to plant the blueberries into landscape fabric to help with weed/grass suppression (and I know I’m going to be thanking myself come July when alllllll the weeds are growing like crazy), but you could certainly skip this step. Then we took a handheld torch (like this one.. just $16! But don’t forget to buy some butane too) and burned and 1.5 foot wide holes in the fabric directly above where each hole was dug.

After that, it’s time to plant! We gently removed the blueberries from their pots and set them into the hole, reaching under the fabric to push back the displaced soil and refill any gaps, making sure to press everything in tightly. We also mulched around the top of each plant with an additional scoop of compost and peat moss, and then gave them a good drink of water with the hose. To finish off the row, we used 6” landscape staples to secure the long sides of the fabric down.

Burning holes into the landscape fabric.

Burning holes into the landscape fabric.

Time to plant!

Time to plant!

With the first row down, we got to do it all over again… twice! Lucky us. ;)

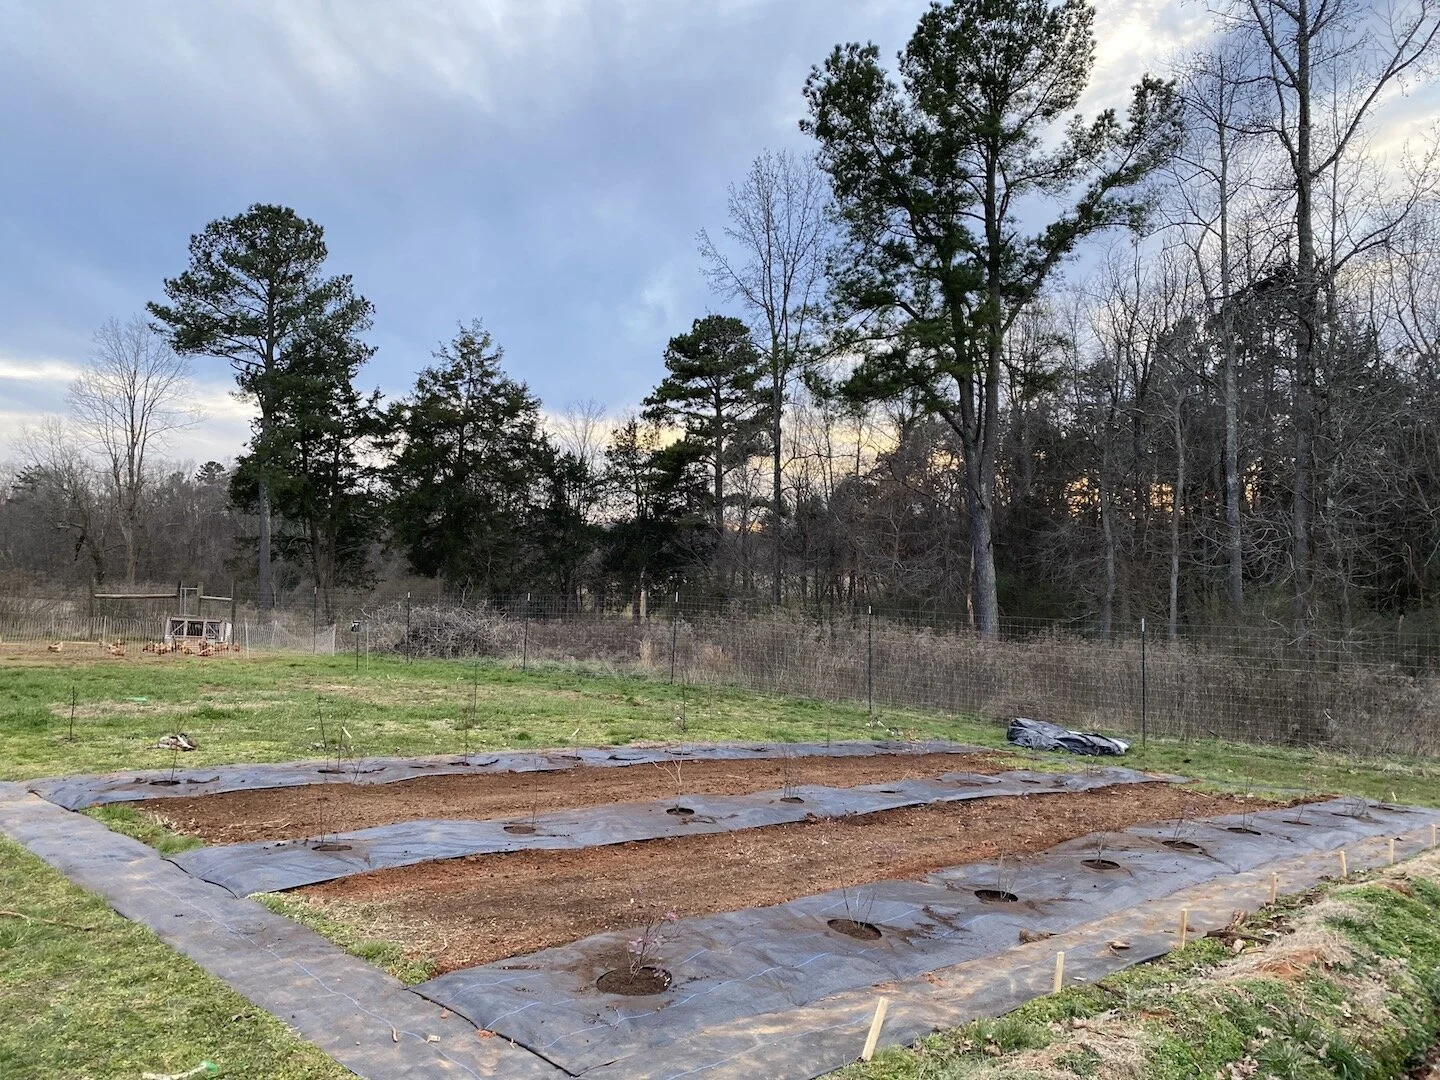
A note that we planted 9 blueberries in each row, spaced 5 ft apart (so each row is ~45 ft long). There is 10 ft in between each of the rows, to allow ample space to harvest from the bushes as they get older/bigger.

Starting on Row #2.

Starting on Row #2.

(Almost) finished!

(Almost) finished!

The final step that we didn’t quite finish today is laying down additional strips of landscape fabric in the pathways in between the rows. Once the fabric is stapled down, we will put down a nice layer of pine bark mulch – which is much nicer to look at than a bunch of landscape fabric, and will also help cut down on weed pressure.

Well friends, there you have it, blueberry planting 101. Got questions? Leave ‘em in the comments!

KITCHEN NOTES

I’m really sure what got into me, but after a long day in the dirt I decided it was a good idea to whip up some butternut squash risotto for dinner, and dang it was SO GOOD. I’ll admit that when I usually think about making risotto, I assume it’s going to be a giant pain (ie lots of standing over a pot and constantly stirring) and I end up making something else. And sometimes, you just want a warm, creamy, salty bowl of risotto, ya know? So, while there was a good amount of stirring involved, I surprised myself with how quickly it all came together. I didn’t really use a specific recipe, but found this straightforward one from The Kitchn, which I’ve shared below in case any of y’all have a hankering for b-nut risotto now…

BUTTERNUT SQUASH RISOTTO

Photo via The Kitchn.

Photo via The Kitchn.

Ingredients

  • 8 cups low-sodium chicken or vegetable broth

  • 3 tablespoons butter, divided

  • 1 medium butternut squash (about 2 1/2 pounds), peeled and cut into 1/2-inch pieces (about 4 cups)

  • 1 1/2 tablespoons chopped fresh sage leaves

  • 1 teaspoon kosher salt, divided

  • 1/2 teaspoon freshly ground black pepper, divided

  • 1 large shallot (or white/yellow onion), finely chopped

  • 2 cups arborio rice

  • 1/2 cup dry white wine

  • 1 cup finely grated Parmesan cheese (about 2 ounces), plus more for serving

Instructions

  1. Place the broth in a medium saucepan over low heat and keep it at a very low simmer.

  2. Melt 1 tablespoon of butter over medium heat in a large, high-sided sauté pan or Dutch oven. Add the butternut squash, sage, 1/2 teaspoon of the salt, and 1/4 teaspoon of the pepper, and cook until the squash is lightly caramelized and tender, 10 to 12 minutes. Transfer the squash to a plate and set aside.

  3. Melt another 1 tablespoon of butter in the pan. Add the shallots (or onions) and sauté until fragrant and beginning to soften, about 4 minutes.

  4. Add the rice and cook, stirring until the edges have turned translucent but the center is still opaque, about 2 minutes. Add the wine and simmer, stirring constantly, until the wine has completely reduced and the pan is nearly dry, about 3 minutes.

  5. Begin incrementally adding the broth one ladle at a time, stirring constantly. Wait until the liquid has been almost completely absorbed by the rice before adding another ladle. After about 12 minutes, stir in the remaining 1/2 teaspoon salt and 1/4 teaspoon pepper and begin tasting the rice to gauge how far it has cooked.

  6. Continue adding broth until the rice is al dente (still has a bit of chew), the broth is creamy, and the dish has the consistency of thick porridge, 20 to 30 minutes total (you might not use up all of the broth). If you run your spatula through the risotto, the risotto should flow slowly to fill in the space.

  7. Remove the pan from the heat. Stir in the reserved squash, Parmesan, and remaining 1 tablespoon butter until melted. Taste and season with salt as needed. Serve immediately, garnishing each bowl with additional Parmesan cheese.

TODAY’S STATS

  • Low temp: 30F

  • High temp: 55F

  • Sunrise: 7:25am

  • Sunset: 5:33pm

  • Moon phase: Waxing Gibbous

  • Additional notes: Cold and cloudy in the AM, turning to blue skies in the afternoon.

January 17

FARM NOTES

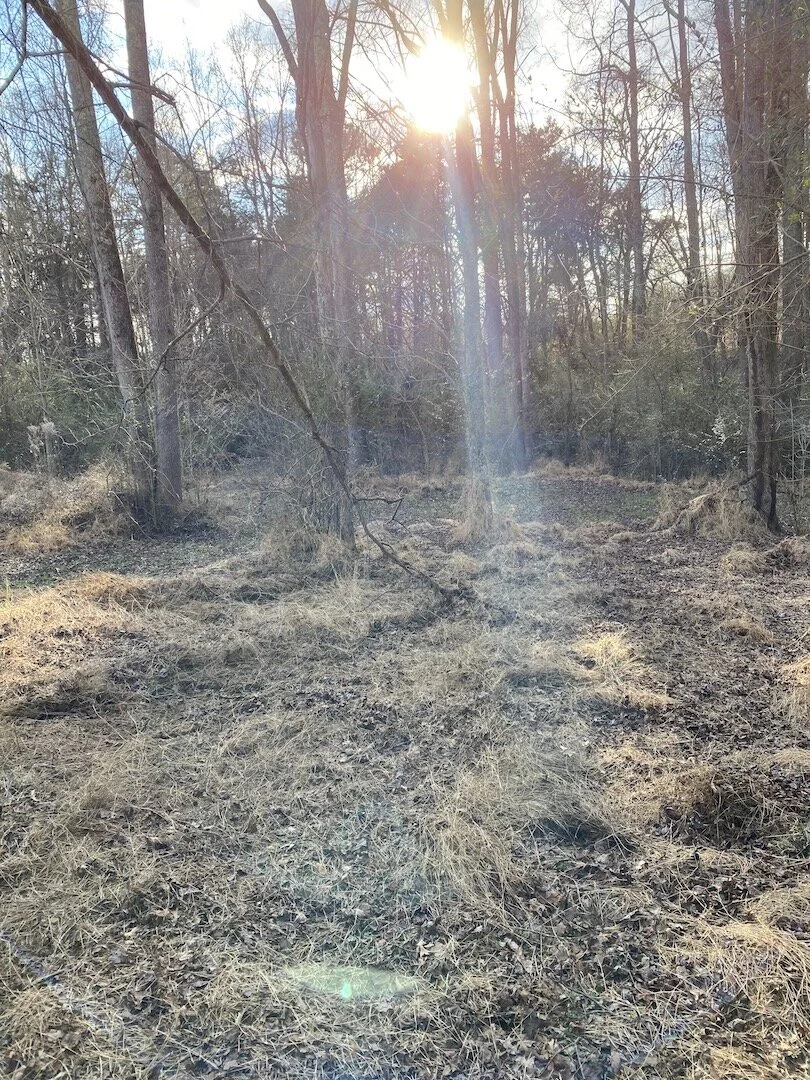
Sundays in the winter are for chainsawing and cleaning up the “back 5”! As I’ve talked about in previous posts, the back part of our property is semi-wooded and a bit wild, and we’re in the process of clearing some downed trees so that we can have the area bush hogged.

We bush hog about twice a year, to keep this area in check from invasive plants like japanese stiltgrass and privet. I’ve accepted that unless we do an extensive application of roundup (something that I’m just not willing to do), we will pretty much always be fighting invasive plants on our property. In the next year or two, we’d like to set up this space to have a few pigs each season, but in the meantime we will keep it wild and love that it is home to so much wildlife – from all kinds of birds to snakes, pollinators, insects, fungi, etc.

BEFORE

BEFORE

AFTER

AFTER

KITCHEN NOTES

Sundays are also for soup! This week’s #sundaysoup is inspired by my time working for Flagstone Pantry in Santa Barbara, a sweet little gourmet to-go spot where pretty much everything was scratch-made with whole, nourishing ingredients. It was a mostly female-run kitchen (which is very rare and very refreshing), and the owner, Kristen, taught me so much about running your own food business with attention to detail and integrity. Kristen has a wonderful website with over 400 (!) recipes for apps, salads, soups, sides, mains, and desserts that are all seriously delicious (and good for you)… go check it out!

There was always a rotation of scratch-made soups every day at Flagstone Pantry, and this Lentil Soup was always once of my favorites. It’s a humble, filling soup that is pretty darn easy to whip up, and you can easily make it vegan by using veggie broth and leaving out the sausage. Makes around 12 cups of soup.

LENTIL SOUP

IMG_2912.jpg

Ingredients

  • 1/2 pound brown lentils

  • 3 tablespoons olive oil

  • 2 yellow onions, diced

  • 3 cloves garlic, minced

  • 2 teaspoons kosher salt

  • 1/2 teaspoons freshly ground black pepper

  • 1 teaspoon ground cumin

  • 1 teaspoon dry thyme or rosemary, crushed

  • 2 cups celery (5-6 stalks), finely diced

  • 2 cups carrots (4-6 carrots), finely diced

  • 4 tablespoons tomato paste (about half of a 6oz can)

  • 6 cups chicken or veggie broth

  • 2-3 pre-cooked sausages, cut in 1/2 lengthwise and sliced 1/3-inch thick

  • 2 tablespoons balsamic vinegar

  • 1 Parmesan rind and freshly grated Parmesan, for serving, optional

Instructions

  1. Rinse lentils in a strainer and pick out any debris. Set aside.

  2. In a large stockpot over medium heat, heat the olive oil and sauté the onions, garlic, salt, pepper, cumin, and thyme for 8-10 minutes, or until the vegetables are translucent and tender.

  3. Add the celery, carrots and tomato paste. Mix to combine. Sauté for another 5 minutes.

  4. Add the chicken broth and lentils. If you’re adding a Parmesan rind to the soup, add it now. Bring to a boil, reduce the heat and simmer uncovered for about 30 minutes or until lentils are tender. Add the sausage and vinegar and simmer until heated through. Remove the Parmesan rind (if using). Taste and adjust seasonings as needed (I usually add some more salt). Serve sprinkled with grated Parmesan cheese.

TODAY’S STATS

  • Low temp: 30F

  • High temp: 48F

  • Sunrise: 7:26am

  • Sunset: 5:28pm

  • Moon phase: Waxing Crescent

  • Additional notes: Cold and sunny in the AM, becoming more cloudy in the afternoon.

January 11

FARM NOTES

Today was yet another cold and dreary Monday in January, so not much time spent outside. Over the weekend, we had crystal clear blue skies and warm sunshine, so Matthew and I spent some time in “the back 5” (aka the back 5 acres of our property, which is semi-wooded and rather unruly) with my favorite new tool – an electric chainsaw!

IMG_2796.jpg

I’ve always had a big fear of chainsaws (which is normal, I think?!) so this is a big deal. There are several dead/downed trees in the the back 5, and we need to clear things out so we can have the area bush-hogged a few times a year.

After a doing a lot of research, we decided to go with a 14” electric chainsaw by Kobalt (the exact model is here). I’m all about using electric tools for the farm whenever possible (like our weed whacker), because I’ve found they have just as much strength as most gas-powered tools, but with a lot less maintenance and headache. We have plans to install solar panels in the near future, so eventually most of our power for the farm will be coming from the sun.

But back to the chainsaw. This model is super light and straightforward to use, and of course we take every precaution (like wearing gloves, safety goggles, hat, and making sure someone else is always working outside nearby) to keep all our limbs in tact. It’s probably not big enough to tackle really large trees/logs, but we figured that’s for the best, since we should probably leave large tree work to the experts anyway.

KITCHEN NOTES

This year we’re trying to make a yummy soup every Sunday, which then means we have soup again for leftovers on Mondays (we are alllll about leftovers around here). Yesterday’s #sundaysoup was a Sweet Potato Chili with Ground Beef. I used a few different recipes as inspiration, but kind of made it up as I went… and dang, it turned out real good. And tastes even better the next day. Below is the basic recipe if you want to give it a try... it may look like a lot of ingredients, but I’ll bet they are all things that you have on hand. This recipe is very forgiving, so feel free to swap in/out based on the ingredients you have available. I don’t really like super spicy chilis, so if you want extra heat, go ahead and add more!

SWEET POTATO CHILI WITH GROUND BEEF

IMG_2782.jpg

Ingredients

  • 2 tablespoons olive oil

  • 1 yellow onion, diced

  • 3 cloves garlic, minced

  • 1 pound lean ground beef (or turkey)

  • 2-3 sweet potatoes, chopped into ½ inch pieces

  • 1 (14 ounce) cans diced fire-roasted tomatoes

  • 3 (15 ounce) cans beans (pinto, kidney, black beans all work)

  • 2 cups vegetable or chicken broth (or water)

  • 1-3 teaspoons chili powder (depending on your heat tolerance)

  • 1 tablespoon ground cumin

  • 2 teaspoons smoked paprika

  • 1/2 teaspoon ground cinnamon

  • 1 teaspoon fine sea salt, plus more to taste

  • 2 tablespoons red wine vinegar, plus more to taste

  • 1/4 cup plain greek yogurt (optional)

Instructions

  1. Add the olive oil to a large stockpot or dutch oven set over medium heat. When hot, add in the diced onion and a pinch of salt and pepper. Cook for about 5 to 7 minutes, until tender. Stir in the garlic and cook for 30 seconds, until fragrant.

  2. Add in the ground beef (or turkey) and cook, breaking it up with a wooden spoon, for about 5 minutes, until no longer pink and cooked through.

  3. Stir in the sweet potato, tomatoes, beans (I don’t drain the beans, as I find the liquid adds flavor and depth to the chili), broth, chili powder, cumin, paprika, cinnamon and salt. Increase the heat and bring the mixture to a simmer.

  4. Continue to simmer gently, adjusting the heat as needed and stirring occasionally, for about 30 minutes, until the chili has thickened and the sweet potatoes are tender (if you find your chili getting too thick, add in some extra broth a little at a time). Remove from the heat.

  5. Taste and add additional salt if needed. I also like to add a splash (or two) of red wine vinegar, to give it a bit of acid. Another secret is to add a big scoop of plain greek yogurt as the chili is cooling, which gives it a delicious tang and richness that I love (but is totally optional, and might be totally weird).

TODAY’S STATS

  • Low temp: 32F

  • High temp: 47F

  • Sunrise: 7:28am

  • Sunset: 5:23pm

  • Moon phase: Waning Crescent

  • Additional notes: Frost in the AM, cold and cloudy most of the day.

Janaury 5

FARM NOTES

I spent most of this cold and dreary day inside and got a few big things checked off my to-do list… one of which was ordering our seed potatoes for this season. I order seed potatoes from our beloved local farm supply store, Country Farm & Home in Pittsboro, and they source them from a reputable grower in Idaho, Grand Teton Organics.

These are our seed potatoes from last season.

These are our seed potatoes from last season.

I love growing potatoes (and by that, I mean I love digging them up and eating them..), and I maaay have gone a bit overboard with all the varieties for this year (7 in all!), with a mix of yukon gold-type potatoes, two red-skinned varieties, some gorgeous purple potatoes, and two types of fingerlings. We have 50 ft rows at our farm, and I usually allot about 8 lbs of seed potatoes per 50 ft bed (with an average of 12” spacing inside the row, though it varies depending on the variety). Here’s a rundown of the different potatoes we will be growing in 2021:

  • German Butterball

  • Gold Nugget

  • Red Johnny

  • Dark Red Norland

  • Purple Majesty

  • French Fingerling

  • Banana Fingerling

If you’re hoping to grow potatoes this year, here’s a great guide/FAQ sheet about growing spuds from the team at Country Farm and Home.

KITCHEN NOTES

tuesdaypizza (1).jpg

If you know me, then you know I have a soft spot for frozen pizza, and you probably also know that Tuesday is our weekly frozen pizza night. This may surprise some of you, but here’s the deal… eating like a farmer doesn’t mean you have to whip up gourmet, scratch-made meals every night.

To me, eating like a farmer means getting creative with the ingredients you have at hand, eating with the seasons whenever possible, and not making meals overly complicated. So for us, that means on Tuesday we have frozen pizza (our fav brand right now is Freschetta) and a big green salad with greens + veggies from the farm. I’m all about shame-free cooking + eating, so you do you! Whether it’s scratch-made, frozen, take-out, or something in-between, I think the most important thing is taking time to sit down and enjoy your meals with intention and gratitude, hopefully around a table with people you love.

TODAY’S STATS

  • Low temp: 31F

  • High temp: 50F

  • Sunrise: 7:23am

  • Sunset: 5:13pm

  • Moon phase: Waning Gibbous

  • Additional notes: Frost in the AM, cold and cloudy most of the day.